Balena Services Masterclass
- Masterclass Type: Core
- Maximum Expected Time To Complete: 120 minutes
Prerequisite Classes
This masterclass builds upon knowledge that has been taught in previous classes. To gain the most from this masterclass, we recommend that you first undertake the following masterclasses:
Introduction
Balena fleets consist of one or more balena services, which are based upon Docker images, containers, volumes and networks. This allows fleets to be extremely flexible, allowing services to be isolated with access only to part of the host required, as well as defining their own networking and data requirements.
This masterclass acts as an introduction to how both single service and multicontainer fleets operate, as well as demonstrating some of their most common uses and some advanced techniques.
In this masterclass, you will learn how to:
- Build a single service
- Persist data across fleet updates
- Communicate between containers and the outside world
- Run
systemdinside yourbalenalibcontainer - Reduce the image size for compiled code
Hardware and Software Requirements
It is assumed that the reader has access to the following:
- A locally cloned copy of this repository
Balena Services Masterclass.
Either:
git clone https://github.com/balena-io/services-masterclass.git- Download ZIP file (from 'Clone or download'->'Download ZIP') and then unzip it to a suitable directory
- A balena-supported device, such as a balenaFin 1.1, Raspberry Pi 3 or Intel NUC. If you don't have a device, you can emulate an Intel NUC by installing VirtualBox and following this guide
- A suitable text editor for developing code on your development platform (e.g. Visual Code)
- A suitable shell environment for command execution (such as
bash) - A balenaCloud account
- Some familiarity with Dockerfiles and docker-compose
- An installation of balena CLI
Exercises
All of the following exercises assume that you are able to access a suitable
Unix based shell and that balena CLI is installed. The exercises include
commands which can be run in such a shell, and are represented by a line
prefixed with $. Information returned from execution of a command may be
appended under the line to show what might be returned. For example:
$ balena version
11.11.2
1. Service Images, Containers, Volumes and Networks
Balena fleets are comprised of service images, containers and volumes. When a project is built, one or more images are generated by the builders and then stored in balena's registries. When a device downloads a project, it retrieves these images from the registries and then stores them locally.
The device Supervisor then examines the images (and any docker-compose manifest associated with them) to determine how to create those services as containers, which form executable instances of an image.
Additionally, volumes (persistent data stores) can be bound to an executable container to ensure that data exists across the service's lifespan.
1.1 Service Images
Service images are the basis for any service. They are comprised of the binaries and data for running services, but they also contain metadata that informs balenaEngine how to initialize and configure the service. As such, an image is essentially a self-contained GNU/Linux filesystem with everything required for running an instance of GNU/Linux, except for the kernel.
Images specified as an image tag can be produced by a variety of sources
including locally on a developer's machine, by pushing in localmode to a balena
device or by the balena builders, which use Dockerfiles to determine what to
include in the image. The following exercises all use the balenaCloud builder to
build images.
See here for more information on Dockerfiles.
1.2 Service Containers
When a service container is created, balenaEngine uses a service image as a 'template' for that container, creating an instance of a filesystem containing all of the files from the image, as well as using the metadata associated with it for configuration.
Service containers are writable, allowing data to be written and read from any directory within that service on its locally created filesystem layers. However, these layers only exist for the lifespan of the container. Containers are recreated for multiple reasons. These can include newer versions of a service image being downloaded, alterations to environment variables names or values, a change in network configuration, etc.
As such, it is never safe to rely on data existing in a service container layer above that of the lifespan of that service container. Temporary data is therefore acceptable use, but any data that is required to persist across container recreation should be stored in persistent volumes.
Note that service recreation is not the same as restarting. Restarting a
service does not require its recreation, and implies that nothing has changed
in the configuration requirements of the service container. However, it can
be tricky to determine when a service might be recreated or restarted
(note there is currently
an issue with the
Supervisor where the /v2/fleets/:fleetId/restart-service endpoint actually
recreates the service container rather than restarting it).
1.3 Service Volumes
Volumes are persistent storage areas which do not get erased when a service container is recreated. These volumes are usually bound to a service container on a specific path, and are stored on the host filesystem without any sort of diff mechanism (that is, any file hierarchy data written to the volume is always available in that hierarchy).
For single service fleets (e.g. non-multicontainer fleets without
a docker-compose manifest), there is a default persistent volume bound to
the /data directory in the service. This path can always be considered
persistent.
For multicontainer fleets, named volumes must be defined as part of the
docker-compose manifest, which can then be bound to services via their
definitions.
Both types of fleets are detailed in the following exercises.
2. Single Service Fleets
Single service fleets, as the name suggests, consist of a single unique
service. These are defined using a Dockerfile, Dockerfile.template or
package.json file, which is built either by a balena environment, a host
development machine or a balena device. The resulting service image is then
downloaded to all devices provisioned against their fleet and executed
on-device by the balenaEngine.
Single service fleets are always privileged. That is, they have access to all of the host device nodes, capabilities, permissions, etc. It's vital to understand this, as essentially there is no difference between any executables running in a privileged service container to that of running on the host itself. Additionally, single service fleets always use host networking, allowing them to bind to any of the host's network interfaces.
If security and sandboxing (which are the primary concern of the container paradigm) are required for either privilege level or to ensure self-contained networking, then a multicontainer fleet should be used (even if only one service is required).
2.1 Building and Deploying a Single Service Fleet
For convenience, export a variable to point to the root of this masterclass repository, as we'll use this for the rest of the exercises, e.g.:
$ export BALENA_SERVICES_MASTERCLASS=~/services-masterclassNow change directory to the single-service-fleet directory in the root of this
masterclass repository, e.g.:
$ cd $BALENA_SERVICES_MASTERCLASS/single-service-fleetEnsure you've created a new named fleet (for example, 'SingleService')
for your balenaFin (or alternative device). Download and provision a development
device image for that fleet and flash it onto your device. If you haven't
already done so, login to your account using balena CLI with balena login and
choose an appropriate authentication method.
Now build the Dockerfile for the fleet:
$ balena push SingleService
[Info]     Starting build for SingleService, user heds
[Info]     Dashboard link: https://dashboard.balena-cloud.com/fleets/1234567/devices
[Info]     Building on arm01
[Info]     Pulling previous images for caching purposes...
[Success]  Successfully pulled cache images
[main]     Step 1/2 : FROM balenalib/fincm3-debian:stretch
[main]      ---> 8a75ea61d9c0
[main]     Step 2/2 : CMD [ "echo", "'Single Service Fleet'", "&&", "sleep", "5" ]
[main]      ---> Running in a7974d28806d
[main]     Removing intermediate container a7974d28806d
[main]      ---> cc8855552d2d
[main]     Successfully built cc8855552d2d
[Info]     Uploading images
[Success]  Successfully uploaded images
[Info]     Built on arm01
[Success]  Release successfully created!
[Info]     Release: bc509f7cba7e6f9eaa3199f621234567 (id: 1095142)
[Info]     ┌─────────┬────────────┬────────────┐
[Info]     │ Service │ Image Size │ Build Time │
[Info]     ├─────────┼────────────┼────────────┤
[Info]     │ main    │ 128.10 MB  │ < 1 second │
[Info]     └─────────┴────────────┴────────────┘
[Info]     Build finished in 15 seconds
                \
                 \
                  \\
                   \\
                    >\/7
                _.-(6'  \
               (=___._/` \
                    )  \ |
                   /   / |
                  /    > /
                 j    < _\
             _.-' :      ``.
             \ r=._\        `.
            <`\\_  \         .`-.
             \ r-7  `-. ._  ' .  `\
              \`,      `-.`7  7)   )
               \/         \|  \'  / `-._
                          ||    .'
                           \\  (
                            >\  >
                        ,.-' >.'
                       <.'_.''
                         <'
This will build and deploy the fleet service to your provisioned device.
2.2 Service Restarts
There's a fairly common misconception that a service will run once and then
stop. This is in fact not the case, and most service containers have a lifespan
that is only as long as it takes to execute the CMD instruction in their
associated Dockerfile (there are exceptions to this rule, but it's usually down
to the type of init system being used, see the
'Running systemd in a Service' section for more
details).
After deploying the single service fleet, you'll notice the following in
the logs for the device (assuming our device's UUID is 1234567):
$ balena logs 1234567
07.10.19 16:41:56 (+0100) Started service 'main sha256:729c0acb2b669929944a68329e7856ac0f356c7e0daabc29b78dbd768f25623f'
07.10.19 16:41:56 (+0100)  main  Single Service Fleet
07.10.19 16:42:02 (+0100) Service exited 'main sha256:729c0acb2b669929944a68329e7856ac0f356c7e0daabc29b78dbd768f25623f'
07.10.19 16:42:04 (+0100) Restarting service 'main sha256:729c0acb2b669929944a68329e7856ac0f356c7e0daabc29b78dbd768f25623f'
07.10.19 16:41:56 (+0100)  main  Single Service Fleet
07.10.19 16:42:03 (+0100)  main  Single Service Fleet
07.10.19 16:42:11 (+0100) Service exited 'main sha256:729c0acb2b669929944a68329e7856ac0f356c7e0daabc29b78dbd768f25623f'
07.10.19 16:42:13 (+0100) Restarting service 'main sha256:729c0acb2b669929944a68329e7856ac0f356c7e0daabc29b78dbd768f25623f'
...
As you can see, the service is restarting every five seconds because the CMD
instruction simply echoes some text to the console, sleeps for five seconds and
then exits. The default restart policy for services in a balena fleet is
always for single service fleets (see
here
for alternative restart policies for services in multicontainer fleets).
We can actually ensure the service never restarts by ensuring that the CMD
instruction never returns. Do this by editing the Dockerfile.template file
and altering the line:
CMD ["/bin/bash", "-c", "echo 'Single Service Fleet'; sleep 5"]to
CMD ["/bin/bash", "-c", "echo 'Single Service Fleet'; sleep infinity"]and then carrying out a push to the fleet:
$ balena push SingleService
[Info]     Starting build for SingleService, user heds
[Info]     Dashboard link: https://dashboard.balena-cloud.com/fleets/1234567/devices
[Info]     Building on arm01
[Info]     Pulling previous images for caching purposes...
[Success]  Successfully pulled cache images
[main]     Step 1/2 : FROM balenalib/fincm3-debian:stretch
[main]      ---> 8a75ea61d9c0
[main]     Step 2/2 : CMD ["/bin/bash", "-c", "echo 'Single Service Fleet'; sleep infinity"]
[main]      ---> Running in 8222f37a6a21
[main]     Removing intermediate container 8222f37a6a21
[main]      ---> 40e00023dacc
[main]     Successfully built 40e00023dacc
[Info]     Uploading images
[Success]  Successfully uploaded images
[Info]     Built on arm01
[Success]  Release successfully created!
[Info]     Release: 25c3a0c5b69be120cc20fb0551234567 (id: 1095210)
[Info]     ┌─────────┬────────────┬────────────┐
[Info]     │ Service │ Image Size │ Build Time │
[Info]     ├─────────┼────────────┼────────────┤
[Info]     │ main    │ 128.10 MB  │ < 1 second │
[Info]     └─────────┴────────────┴────────────┘
[Info]     Build finished in 15 seconds
                \
                 \
                  \\
                   \\
                    >\/7
                _.-(6'  \
               (=___._/` \
                    )  \ |
                   /   / |
                  /    > /
                 j    < _\
             _.-' :      ``.
             \ r=._\        `.
            <`\\_  \         .`-.
             \ r-7  `-. ._  ' .  `\
              \`,      `-.`7  7)   )
               \/         \|  \'  / `-._
                          ||    .'
                           \\  (
                            >\  >
                        ,.-' >.'
                       <.'_.''
                         <'
You'll now see the logs update to:
$ balena logs 1234567
...
07.10.19 16:43:13 (+0100) Started service 'main sha256:40e00023dacc51383788d462548b6fb7880a9561b784306b01984ac7ce4e529e'
07.10.19 16:43:12 (+0100)  main  Single Service Fleet
It is therefore important when writing services to ensure that if they are expected to exit and not restart, then the restart policy should be altered accordingly.
2.3 Persistent Data
In a single service fleet, permanent data can be stored in the /data
directory. Change the CMD line in the Dockerfile.template to:
CMD ["/bin/bash", "-c", "date >> /data/datestamps; sleep infinity"]then balena push to the fleet and wait for it to restart. Now SSH into the
main service on the device:
$ balena ssh 1234567 main
root@1234567:/# cat /data/datestamps
Tue Oct  8 10:48:38 UTC 2019
root@1234567:/# exit
Now re-push that project and then SSH back into the service after it is recreated:
$ balena push SingleService
$ balena ssh 1234567 main
root@1234567:/# cat /data/datestamps
Tue Oct  8 10:48:38 UTC 2019
Tue Oct  8 10:52:44 UTC 2019
root@1234567:/# exit
As can be seen, all previous data has persisted.
3. Multicontainer Fleets
Multicontainer fleets allow more than one service to run on a device at the same time. This allows fleet developers to split their fleet up into logical components where each component handles a different function of the fleet.
Unlike single service fleets, balenaEngine will generate an internal bridge network for services to communicate between themselves. This bridge allows the ingress of network traffic from host interfaces only to services which have explicitly specified that they listen on given ports.
3.1 Multicontainer docker-compose Manifest
Balena allows the configuration of a multicontainer service fleet via the
use of a docker-compose manifest. This is a list of all services, including
any capabilities, permissions, access, environment variables, etc. that each
service may require, as well as the definition and configuration of any shared
resources that those services may require. One very important difference between
single service and multicontainer fleets is that multicontainer services
are not privileged by default. This means that if you want access to host
device nodes, capabilities, etc. then you need to either enable privileged
access within the docker-compose manifest, or pick a subset of the access
that the service requires using relevant keywords in that service definition.
To demonstrate a multicontainer fleet, we'll start with a couple of very simple services that we'll build up to include some security sandboxing and access to the host.
If you haven't already done so, create a fleet (for example, 'MulticontainerServices')
for your balenaFin (or alternative device). Download and provision a development
device image for the fleet and flash it onto your device.
Login to your account using balena CLI with balena login and
choose an appropriate authentication method. Make a note of the UUID of the
device.
First change to the multicontainer part of the masterclass repository, and then push the code that exists there:
$ cd $BALENA_SERVICES_MASTERCLASS/multicontainer-fleet
$ balena push MulticontainerServices
[Info]      Starting build for MulticontainerServices, user heds
[Info]      Dashboard link: https://dashboard.balena-cloud.com/fleets/1234567/devices
[Info]      Building on arm03
[Info]      Pulling previous images for caching purposes...
[Success]   Successfully pulled cache images
[frontend]  Step 1/6 : FROM balenalib/fincm3-node:10
[frontend]   ---> 69edcb7b108d
[frontend]  Step 2/6 : WORKDIR /usr/src/app
[frontend]   ---> Running in 5a7d97acbc76
[frontend]  Removing intermediate container 5a7d97acbc76
[frontend]   ---> 5e7214e870d2
[frontend]  Step 3/6 : COPY package* ./
[frontend]   ---> 4f98fffd4085
[frontend]  Step 4/6 : RUN npm ci --production && npm cache clean --force && rm -rf /tmp/*
[frontend]   ---> Running in 6188deb15fc0
[frontend]  added 50 packages in 1.021s
[frontend]  npm
[frontend]
[frontend]  WARN using --force
[frontend]   I sure hope you know what you are doing.
[frontend]
[frontend]  Removing intermediate container 6188deb15fc0
[frontend]   ---> ee09e6525323
[frontend]  Step 5/6 : COPY index.js ./
[frontend]   ---> 4ed9ae08138b
[frontend]  Step 6/6 : CMD ["npm", "start"]
[frontend]   ---> Running in 123bdda0f3fc
[frontend]  Removing intermediate container 123bdda0f3fc
[frontend]   ---> 83c5f1749f99
[frontend]  Successfully built 83c5f1749f99
[Info]      Uploading images
[Success]   Successfully uploaded images
[Info]      Built on arm03
[Success]   Release successfully created!
[Info]      Release: 604a0578dec5d7be5f85c08ff1234567 (id: 1096753)
[Info]      ┌──────────┬────────────┬────────────┐
[Info]      │ Service  │ Image Size │ Build Time │
[Info]      ├──────────┼────────────┼────────────┤
[Info]      │ frontend │ 216.32 MB  │ 8 seconds  │
[Info]      └──────────┴────────────┴────────────┘
[Info]      Build finished in 30 seconds
                \
                 \
                  \\
                   \\
                    >\/7
                _.-(6'  \
               (=___._/` \
                    )  \ |
                   /   / |
                  /    > /
                 j    < _\
             _.-' :      ``.
             \ r=._\        `.
            <`\\_  \         .`-.
             \ r-7  `-. ._  ' .  `\
              \`,      `-.`7  7)   )
               \/         \|  \'  / `-._
                          ||    .'
                           \\  (
                            >\  >
                        ,.-' >.'
                       <.'_.''
                         <'
This will create an fleet with a single service that acts as a frontend, which allows an HTTP GET from the root of the device. Determine the IP address of the device, by doing:
$ balena devices | grep MulticontainerServices
12345678 0987654 restless-bush    fincm3          MulticontainerServices Idle   true      10.2.2             balenaOS 2.43.0+rev1 https://dashboard.balena-cloud.com/devices/098765493a9a14ad383505563a113f/summary
$ balena device 0987654 | grep IP
IP ADDRESS:         192.168.1.167
And then send an HTTP request using curl:
$ curl http://192.168.1.167
This is the frontend root
This shows the device exposing port 80 (HTTP) and responding with some data when an HTTP GET is requested.
We'll add another service which will act as a backend that supplies data to the
frontend. The code for this already exists in the
$BALENA_SERVICES_MASTERCLASS/multicontainer-fleet/backend directory, but is not used
as the docker-compose manifest does not define another service that uses it.
To do so, we'll add a new service to the manifest and alter the frontend code
slightly to try and use the backend. In the docker-compose.yml manifest,
add the following after the frontend service definition:
  backend:
    build: ./backend
    ports:
      - "1234:1234"
Push to the fleet again. Once the fleet has built and the device has downloaded the updates, prove that you can acquire the backend data from your development machine:
$ curl http://192.168.1.167:1234/data
2019-10-08T15:36:14.729Z
3.2 Persistent Data
Unlike single service fleets, multicontainer fleets do not bind a
persistent storage volume automatically into a service container. Instead,
volumes need to be explicitly defined in the docker-compose manifest in
named volume format. Only named volumes are supported, as no host directories
may be bound into a service container (for OS stability and safety issues).
To demonstrate persistent volumes in a multicontainer fleet, add the
following to near the beginning of the docker-compose.yml file, after the
version line:
volumes:
  my-first-volume:
  a-second-volume:
These can then be used by services to store persistent data by binding a named
volume into the service. Add the following to the end of the frontend
service definition in the docker-compose.yml file:
    volumes:
      - 'my-first-volume:/frontend-data'
      - 'a-second-volume:/backend-data'
And the following to the end of the backend service definition:
    volumes:
      - 'a-second-volume:/backend-persistence'
These lines will bind both named volumes into the frontend service at
path locations /frontend-data and /backend-data, and just the
a-second-volume named volume into the backend service at
/backend-persistence. Now push to the fleet again:
$ balena push MulticontainerServicesOnce built and the device has downloaded the updated project, SSH into the
frontend service:
$ balena ssh 0987654 frontend
root@0987654:/usr/src/app# echo 'First volume' > /frontend-data/somedata
root@0987654:/usr/src/app# echo 'Second volume' > /backend-data/somedata
root@0987654:/usr/src/app# exit
Now SSH into the backend service, to verify that data stored by the frontend
service into the shared volume can be seen by the backend service:
root@0987654:/usr/src/app# cat /backend-persistence/somedata
Second volume
root@0987654:/usr/src/app# echo 'Second volume 2' >> /backend-persistence/somedata
root@0987654:/usr/src/app# exit
Now re-push that project to the device:
$ balena push MulticontainerServicesWait for the device to update, then SSH into the frontend container to verify
that all the stored data from both services has correctly persisted:
$ balena ssh 0987654 frontend
root@0987654:/usr/src/app# cat /frontend-data/somedata
First volume
root@0987654:/usr/src/app# cat /backend-data/somedata
Second volume
Second volume 2
root@0987654:/usr/src/app# exit
4. Networking Types
There are two main types of networking supported by balenaEngine, host and
bridge networks. There are some differences between them:
hostmode allows a service to use all host network interfacesbridgemode uses a bridge network interface which all service containers are connected to
This means a couple of things when developing fleets. Any service that
uses host networking does not have to explicitly define ports for traffic
ingress, and a service can bind to all interfaces and expect incoming traffic
to the host. Single service fleets always use host networking.
By contrast, bridge networking essentially isolates all services from the
host, requiring services to explicitly define open ports to allow traffic from
the host to be passed to them (although all outgoing connections are allowed
and will allow incoming data from those connections). By default, multicontainer
fleet servers always use a self-defined bridge network.
There's a couple of points to note alongside this:
- Most backend services in production fleets are not publicly exposed (that is, they are not useable outside of the host machine) to ensure security and to ensure there is only one or two main endpoints (for example an API service)
- Some services may want direct access to host capabilities (such as device nodes), and it's generally more sensible to sandbox these services away from public access
Given this knowledge, and how we've defined our frontend and backend
services, you can see that we're using both host (for the frontend service)
and bridge (for the backend service) networking. The backend shouldn't
really be exposed, as we want the frontend to retrieve data from it and
then pass it to an external query.
Here's a diagram showing what's currently happens with network traffic:
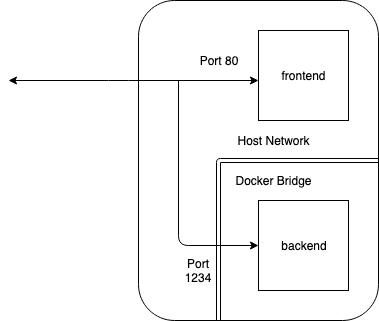
And here's a diagram showing what we want to happen:
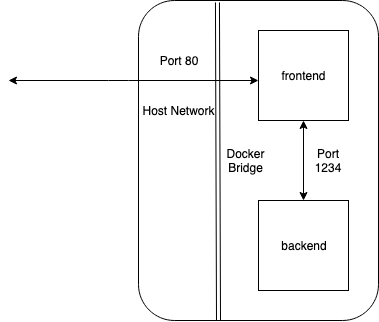
In short, we want to ensure that the backend service is not reachable from
any component that isn't connected to it via the same bridge, and that only
the frontend is exposed to the host and beyond.
To do this, we're going to remove host network access from the frontend
service to allow external incoming network traffic into it, as well as ensure
only incoming requests from the same bridge (i.e. the frontend service) are
allowed into the backend service.
Modify the services section of the docker-compose.yml file to the following:
  frontend:
    build: ./frontend
    ports:
      - "80:80"
  backend:
    build: ./backend
    expose:
      - "1234"
The expose keyword exposes specified network ports on the backend component
only to services on the same bridge (in this case frontend). This is not
strictly required because in current versions of balenaEngine (and Docker)
services on the same bridge have access to all other services ports, but for our
purposes it reinforces the idea of this behavior.
Now add the following to the
$BALENA_SERVICES_MASTERCLASS/multicontainer-fleet/frontend/index.js file:
app.get('/backend_data', (_req, res) => {
    request('http://backend:1234/data', (err, data) => {
        if (err) {
            res.send(`Error: ${err}\n`).status(500);
        } else {
            res.send(`Backend data says: ${data.body}\n`);
        }
    });
});
Each service can be referenced as a host by its service name by any other
service on the same bridge. For this reason, an HTTP request to backend
from the frontend service will resolve to the correct internal IP address
for the backend service.
Push to the fleet again:
$ balena push MulticontainerServicesLet's try using the same endpoints as before to request some HTTP data from
both the frontend and backend services from your development machine:
$ curl http://192.168.1.167
This is the frontend root
$ curl http://192.168.1.167:1234/data
curl: (7) Failed to connect to 192.168.1.167 port 1234: Connection refused
You can see we are no longer able to talk to request data from the backend
service, as it's not allowing incoming data outside of the bridge network it
exists on. However, if we now request data from the /backend_data endpoint
on the front service, we'll see it uses data it requests from the backend
service in the same bridge:
$ curl http://192.168.1.167/backend_data
Backend data says: 2019-10-09T11:35:44.756Z
The balena Supervisor also supports the creation of multiple bridge networks, allowing you to compartmentalize further (so that some services exist in only one defined network, whereas others might be able to communicate in many). There's a good section on this in the Docker networking guide.
balena docker-compose manifests also allow the defining of IPAM
bridge networks; see
here
for more details, as well as the
aliases
keyword for providing alias names for services (including FQDNs).
5. Running systemd in a Service
Note: This section assumes some pre-existing knowledge of
systemd, which is an
init system that uses ordering rules
to determine which processes should be executed, and in what order.
Most services are designed to run a single executable, and with the advent of
multicontainer fleets this allowed a fleet to contain many
services, each of which was responsible for a portion of the whole. Whilst this
is the preferred method of operation for fleets, there are times where
several processes may be required to run in unison within a single service.
balena supports the use of systemd within services, by either running as
privileged containers, or via some carefully crafted capabilities.
Change directory to the systemd directory in the root of this masterclass
repository, e.g.:
$ cd $BALENA_SERVICES_MASTERCLASS/systemdEnsure you've created a new named fleet (for example, 'systemd')
for your balenaFin (or alternative device). Download and provision a development
device image for that fleet and flash it onto your device. If you haven't
already done so, login to your account using balena CLI with balena login and
choose an appropriate authentication method. Make a note of the UUID of the
device.
The $BALENA_SERVICES_MASTERCLASS/systemd/printer/Dockerfile.template is
initially empty. We need to fill this in to create a service image that installs
systemd as the init process. Add the following to the file:
FROM balenalib/%%BALENA_MACHINE_NAME%%-debian-node:10-buster

# Install both DBus and systemd support
RUN install_packages dbus systemd

# Mask services which do not make sense to run in a service container
RUN systemctl mask \
    dev-hugepages.mount \
    sys-fs-fuse-connections.mount \
    sys-kernel-config.mount \
    display-manager.service \
    getty@.service \
    systemd-logind.service \
    systemd-remount-fs.service \
    getty.target \
    graphical.target
This installs systemd as well as dbus (which systemd requires) together
using a suitable Debian base image and then masks services that do should not be
run inside a container.
Now we need to use a suitable entry point that will execute systemd as the
init process. There's actually already a suitable shell script for this, in
$BALENA_SERVICES_MASTERCLASS/systemd/printer/entry.sh. This entry script
ensures that console output does not close on script exit, and then executes
systemd to act as the init process (via the use of exec, which ensures that
it runs as PID 1). We'll copy this entry script into the service image and then
set it as the service entrypoint. Add the following to the end of what you've
already added to
$BALENA_SERVICES_MASTERCLASS/systemd/printer/Dockerfile.template:
# Copy our systemd entrypoint script and ensure it's used
COPY entry.sh /usr/bin
STOPSIGNAL 37
ENTRYPOINT ["/usr/bin/entry.sh"]
Note the STOPSIGNAL directive. By default balenaEngine (and Docker) will send
the SIGTERM signal to PID 1 (whatever executable is started using CMD
or in our case systemd started from the entry.sh script). However, systemd
requires that RTMIN+3 is sent to it to initiate a shutdown. As such, we change
the stop signal sent here to ensure systemd shuts down cleanly when the
service container is stopped.
We're now ready to push the multicontainer project for running systemd to
your fleet:
$ cd $BALENA_SERVICES_MASTERCLASS/systemd
$ balena push systemd
balena push systemd --nocache
[Info]     Starting build for systemd, user heds
[Info]     Dashboard link: https://dashboard.balena-cloud.com/fleets/0987654/devices
[Info]     Building on arm03
[Info]     Pulling previous images for caching purposes...
[Success]  Successfully pulled cache images
[printer]  Step 1/6 : FROM balenalib/fincm3-debian-node:10-buster
[printer]   ---> 69edcb7b108d
[printer]  Step 2/6 : RUN apt-get update && apt-get install -y     dbus     systemd     && rm -rf /var/lib/apt/lists/*
[printer]   ---> Running in eca1080e9ebc
[printer]  Get:1 http://deb.debian.org/debian buster InRelease [122 kB]
[printer]  Get:2 http://deb.debian.org/debian buster-updates InRelease [49.3 kB]
[printer]  Get:3 http://security.debian.org/debian-security buster/updates InRelease [39.1 kB]
[printer]  Get:4 http://archive.raspberrypi.org/debian buster InRelease [25.2 kB]
[printer]  Get:5 http://archive.raspbian.org/raspbian buster InRelease [15.0 kB]
[printer]  Get:6 http://deb.debian.org/debian buster/main armhf Packages [7690 kB]
[printer]  Get:7 http://deb.debian.org/debian buster-updates/main armhf Packages [5780 B]
[printer]  Get:8 http://security.debian.org/debian-security buster/updates/main armhf Packages [97.0 kB]
[printer]  Get:9 http://archive.raspberrypi.org/debian buster/main armhf Packages [259 kB]
[printer]  Get:10 http://archive.raspbian.org/raspbian buster/contrib armhf Packages [58.7 kB]
[printer]  Get:11 http://archive.raspbian.org/raspbian buster/main armhf Packages [13.0 MB]
[printer]  Get:12 http://archive.raspbian.org/raspbian buster/rpi armhf Packages [1360 B]
[printer]  Get:13 http://archive.raspbian.org/raspbian buster/non-free armhf Packages [103 kB]
[printer]  Get:14 http://archive.raspbian.org/raspbian buster/firmware armhf Packages [1232 B]
[printer]  Fetched 21.5 MB in 5s (4558 kB/s)
[printer]  Reading package lists...
[printer]  Reading package lists...
[printer]  Building dependency tree...
[printer]  Reading state information...
[printer]  The following additional packages will be installed:
[printer]    dmsetup libapparmor1 libargon2-1 libcryptsetup12 libdbus-1-3
[printer]    libdevmapper1.02.1 libexpat1 libidn11 libip4tc0 libjson-c3 libsystemd0
[printer]  Suggested packages:
[printer]    default-dbus-session-bus | dbus-session-bus systemd-container policykit-1
[printer]  Recommended packages:
[printer]    libpam-systemd
[printer]  The following NEW packages will be installed:
[printer]    dbus dmsetup libapparmor1 libargon2-1 libcryptsetup12 libdbus-1-3
[printer]    libdevmapper1.02.1 libexpat1 libidn11 libip4tc0 libjson-c3 systemd
[printer]  The following packages will be upgraded:
[printer]    libsystemd0
[printer]  1 upgraded, 12 newly installed, 0 to remove and 42 not upgraded.
[printer]  Need to get 4748 kB of archives.
...
[printer]  Setting up systemd (241-7~deb10u1+rpi1) ...
[printer]  Created symlink /etc/systemd/system/getty.target.wants/getty@tty1.service → /lib/systemd/system/getty@.service.
[printer]  Created symlink /etc/systemd/system/multi-user.target.wants/remote-fs.target → /lib/systemd/system/remote-fs.target.
[printer]  Created symlink /etc/systemd/system/dbus-org.freedesktop.timesync1.service → /lib/systemd/system/systemd-timesyncd.service.
[printer]  Created symlink /etc/systemd/system/sysinit.target.wants/systemd-timesyncd.service → /lib/systemd/system/systemd-timesyncd.service.
[printer]  Processing triggers for libc-bin (2.28-10) ...
[printer]  Removing intermediate container eca1080e9ebc
[printer]   ---> 0a5b8a2babec
[printer]  Step 3/6 : RUN systemctl mask     dev-hugepages.mount     sys-fs-fuse-connections.mount     sys-kernel-config.mount     display-manager.service     getty@.service     systemd-logind.service     systemd-remount-fs.service     getty.target     graphical.target
[printer]   ---> Running in 7ae596562fcc
[printer]  Created symlink /etc/systemd/system/dev-hugepages.mount → /dev/null.
[printer]  Created symlink /etc/systemd/system/sys-fs-fuse-connections.mount → /dev/null.
[printer]  Created symlink /etc/systemd/system/sys-kernel-config.mount → /dev/null.
[printer]  Created symlink /etc/systemd/system/display-manager.service → /dev/null.
[printer]  Created symlink /etc/systemd/system/getty@.service → /dev/null.
[printer]  Created symlink /etc/systemd/system/systemd-logind.service → /dev/null.
[printer]  Created symlink /etc/systemd/system/systemd-remount-fs.service → /dev/null.
[printer]  Created symlink /etc/systemd/system/getty.target → /dev/null.
[printer]  Created symlink /etc/systemd/system/graphical.target → /dev/null.
[printer]
[printer]  Removing intermediate container 7ae596562fcc
[printer]   ---> 55a9aa09c030
[printer]  Step 4/6 : COPY entry.sh /usr/bin
[printer]   ---> 9ca62dcd443c
[printer]  Step 5/6 : STOPSIGNAL 37
[printer]   ---> Running in 1090563ff3d5
[printer]  Removing intermediate container 1090563ff3d5
[printer]   ---> 4cdfea2d94c8
[printer]  Step 6/6 : ENTRYPOINT ["/usr/bin/entry.sh"]
[printer]   ---> Running in a10f9f302d3c
[printer]  Removing intermediate container a10f9f302d3c
[printer]   ---> 58bee05bacdf
[printer]  Successfully built 58bee05bacdf
[Info]     Uploading images
[Success]  Successfully uploaded images
[Info]     Built on arm03
[Success]  Release successfully created!
[Info]     Release: 6873d36e22cbc56951fca4edc0987654 (id: 1099882)
[Info]     ┌─────────┬────────────┬────────────┐
[Info]     │ Service │ Image Size │ Build Time │
[Info]     ├─────────┼────────────┼────────────┤
[Info]     │ printer │ 228.02 MB  │ 20 seconds │
[Info]     └─────────┴────────────┴────────────┘
[Info]     Build finished in 37 seconds
                \
                 \
                  \\
                   \\
                    >\/7
                _.-(6'  \
               (=___._/` \
                    )  \ |
                   /   / |
                  /    > /
                 j    < _\
             _.-' :      ``.
             \ r=._\        `.
            <`\\_  \         .`-.
             \ r-7  `-. ._  ' .  `\
              \`,      `-.`7  7)   )
               \/         \|  \'  / `-._
                          ||    .'
                           \\  (
                            >\  >
                        ,.-' >.'
                       <.'_.''
                         <'
We've cut down the build log a bit, to make it shorter. Wait for the project to be downloaded and started on the device, then look at the logs for the device:
$ balena logs 3456789
[Logs]    [10/10/2019, 11:47:34 AM] Supervisor starting
[Logs]    [10/10/2019, 11:47:40 AM] Applying configuration change {"SUPERVISOR_POLL_INTERVAL":"900000"}
[Logs]    [10/10/2019, 11:47:40 AM] Applied configuration change {"SUPERVISOR_POLL_INTERVAL":"900000"}
[Logs]    [10/10/2019, 11:47:41 AM] Creating network 'default'
[Logs]    [10/10/2019, 11:47:41 AM] Downloading image 'registry2.balena-cloud.com/v2/34dcf013511d78d53bc09fb0987654@sha256:1778920e0a7f534e1d50478541797892155ac623eb8bbf8aad2137a1f0229ec8'
[Logs]    [10/10/2019, 11:49:00 AM] Downloaded image 'registry2.balena-cloud.com/v2/34dcf013511d78d53bc09fb03a3265ed@sha256:1778920e0a7f534e1d50478541797892155ac623eb8bbf8aad2137a1f0229ec8'
[Logs]    [10/10/2019, 11:49:01 AM] Installing service 'printer sha256:a2794bdb47a3406455a3b095e3876981c4557c32f928c2b40289c15964aa281b'
[Logs]    [10/10/2019, 11:49:01 AM] Installed service 'printer sha256:a2794bdb47a3406455a3b095e3876981c4557c32f928c2b40289c15964aa281b'
[Logs]    [10/10/2019, 11:49:01 AM] Starting service 'printer sha256:a2794bdb47a3406455a3b095e3876981c4557c32f928c2b40289c15964aa281b'
[Logs]    [10/10/2019, 11:49:04 AM] Started service 'printer sha256:a2794bdb47a3406455a3b095e3876981c4557c32f928c2b40289c15964aa281b'
[Logs]    [10/10/2019, 11:49:04 AM] [printer] Systemd init system enabled.
[Logs]    [10/10/2019, 11:49:04 AM] [printer]
[Logs]    [10/10/2019, 11:49:04 AM] [printer] Welcome to Debian GNU/Linux 10 (buster)!
[Logs]    [10/10/2019, 11:49:04 AM] [printer]
[Logs]    [10/10/2019, 11:49:04 AM] [printer] [  OK  ] Listening on udev Control Socket.
[Logs]    [10/10/2019, 11:49:04 AM] [printer] [  OK  ] Listening on Journal Socket (/dev/log).
[Logs]    [10/10/2019, 11:49:04 AM] [printer] [  OK  ] Reached target Remote File Systems.
[Logs]    [10/10/2019, 11:49:04 AM] [printer] [  OK  ] Listening on Journal Socket.
...
We've not printed all the logs here, as there'll be a lot, but it shows that
systemd has successfully started as the init process.
SSH into the service, and then run systemctl to see all of the services
currently running:
$ balena ssh 3456789 printer
$ root@dffe197d303e:/# systemctl
UNIT                               LOAD   ACTIVE     SUB       DESCRIPTION
proc-sys-fs-binfmt_misc.automount  loaded active     waiting   Arbitrary Executable File Formats File System Automount Point
dev-mmcblk0p6.device               loaded activating tentative /dev/mmcblk0p6
-.mount                            loaded active     mounted   /
dev-mqueue.mount                   loaded active     mounted   POSIX Message Queue File System
etc-hostname.mount                 loaded active     mounted   /etc/hostname
etc-hosts.mount                    loaded active     mounted   /etc/hosts
etc-resolv.conf.mount              loaded active     mounted   /etc/resolv.conf
sys-kernel-debug.mount             loaded active     mounted   Kernel Debug File System
...
Again, the list has been edited for brevity, but you can see that we've now
a running, non-exiting systemd-based service container.
There is a problem with how we're running our container, though. Have a look at
the definition of the printer service for the
$BALENA_SERVICES_MASTERCLASS/systemd/docker-compose.yml file:
  printer:
    privileged: true
    build: ./printer
The immediately obvious issue here is that we've set this to be a privileged
service. Why? Because systemd actually requires several capabilities and mount
points that otherwise wouldn't be available. However, running a service as
privileged just because you need systemd inside it is not a very satisfactory
solution. So, what we'll do instead is now make some changes to the service
definition to run it non-privileged.
Change the printer service definition to the following:
    printer:
    build: ./printer
    cap_add:
      - SYS_RESOURCE
      - SYS_ADMIN
    security_opt:
      - 'apparmor:unconfined'
    tmpfs:
      - /sys/fs/cgroup
This removes the privileged mode, but sets some extended access for the service, mainly:
- Removing default resource limits and allow system administration options to be used
- The unconfining of the AppArmor kernel module, to allow
systemdto run correctly - A RAM based tmpfs mount to allow
systemdto handle its own control groups set
Whilst there are a lot of access options here that do use the host, it should
be noted this is still better than the use of privileged mode.
Push the project again with the changes:
$ balena push systemd
[Info]     Starting build for systemd, user heds
[Info]     Dashboard link: https://dashboard.balena-cloud.com/fleets/0987654/devices
[Info]     Building on arm03
[Info]     Pulling previous images for caching purposes...
[Success]  Successfully pulled cache images
[printer]  Step 1/6 : FROM balenalib/fincm3-debian-node:10-buster
[printer]   ---> 69edcb7b108d
[printer]  Step 2/6 : RUN apt-get update && apt-get install -y     dbus     systemd     && rm -rf /var/lib/apt/lists/*
[printer]  Using cache
[printer]   ---> 307c43e85829
[printer]  Step 3/6 : RUN systemctl mask     dev-hugepages.mount     sys-fs-fuse-connections.mount     sys-kernel-config.mount     display-manager.service     getty@.service     systemd-logind.service     systemd-remount-fs.service     getty.target     graphical.target
[printer]  Using cache
[printer]   ---> 7e70c9bf5a84
[printer]  Step 4/6 : COPY entry.sh /usr/bin
[printer]  Using cache
[printer]   ---> f3d3853bd0e5
[printer]  Step 5/6 : STOPSIGNAL 37
[printer]  Using cache
[printer]   ---> 34110ab55ff5
[printer]  Step 6/6 : ENTRYPOINT ["/usr/bin/entry.sh"]
[printer]  Using cache
[printer]   ---> 58bee05bacdf
[printer]  Successfully built 58bee05bacdf
[Info]     Uploading images
[Success]  Successfully uploaded images
[Info]     Built on arm03
[Success]  Release successfully created!
[Info]     Release: 551397c1633fd8866e1ee18b30987654 (id: 1100080)
[Info]     ┌─────────┬────────────┬────────────┐
[Info]     │ Service │ Image Size │ Build Time │
[Info]     ├─────────┼────────────┼────────────┤
[Info]     │ printer │ 228.02 MB  │ < 1 second │
[Info]     └─────────┴────────────┴────────────┘
[Info]     Build finished in 17 seconds
                \
                 \
                  \\
                   \\
                    >\/7
                _.-(6'  \
               (=___._/` \
                    )  \ |
                   /   / |
                  /    > /
                 j    < _\
             _.-' :      ``.
             \ r=._\        `.
            <`\\_  \         .`-.
             \ r-7  `-. ._  ' .  `\
              \`,      `-.`7  7)   )
               \/         \|  \'  / `-._
                          ||    .'
                           \\  (
                            >\  >
                        ,.-' >.'
                       <.'_.''
                         <'
A quick SSH into the printer service will show that systemd is still running
as the init process:
$ balena ssh 3456789 printer
$ root@dffe197d303e:/# systemctl
UNIT                               LOAD   ACTIVE     SUB       DESCRIPTION
proc-sys-fs-binfmt_misc.automount  loaded active     waiting   Arbitrary Executable File Formats File System Automount Point
dev-mmcblk0p6.device               loaded activating tentative /dev/mmcblk0p6
-.mount                            loaded active     mounted   /
dev-mqueue.mount                   loaded active     mounted   POSIX Message Queue File System
etc-hostname.mount                 loaded active     mounted   /etc/hostname
etc-hosts.mount                    loaded active     mounted   /etc/hosts
etc-resolv.conf.mount              loaded active     mounted   /etc/resolv.conf
sys-kernel-debug.mount             loaded active     mounted   Kernel Debug File System
...
Whilst we've now mostly dealt with running systemd in a container, for
completeness we'll also show how to quickly add a service so it starts when the
service container is started. Add the following to the end of the
$BALENA_SERVICES_MASTERCLASS/systemd/printer/Dockerfile.template file:
# Install the systemd printer service
COPY printer.service /etc/systemd/system
RUN systemctl enable printer.service

# Install any required modules for the printer service
WORKDIR /usr/src/app
COPY package* ./
RUN npm ci --production && npm cache clean --force && rm -rf /tmp/*
COPY index.js ./
This will copy the systemd printer service file into the relevant directory
for systemd to use it, enable that service and then build the code for
that service.
Now balena push systemd again, wait for the device to download the updated
project and then examine the logs:
$ balena logs 3456789
[Logs]    [10/10/2019, 3:36:10 PM] Started service 'printer sha256:2dc7b5f95cce246a26341eee02cb6e0d4ac93b715036fbe1858a7afda66062b3'
[Logs]    [10/10/2019, 3:36:10 PM] [printer] Systemd init system enabled.
...
[Logs]    [10/10/2019, 3:36:11 PM] [printer] [  OK  ] Started Update UTMP about System Runlevel Changes.
[Logs]    [10/10/2019, 3:36:12 PM] [printer] [13782.613630] npm[44]: > printer@1.0.0 start /usr/src/app
[Logs]    [10/10/2019, 3:36:12 PM] [printer] [13782.614657] npm[44]: > node index.js
[Logs]    [10/10/2019, 3:36:23 PM] [printer] [13792.964777] npm[44]: Time is now Thu, 10 Oct 2019 14:36:23 GMT
[Logs]    [10/10/2019, 3:36:33 PM] [printer] [13802.960305] npm[44]: Time is now Thu, 10 Oct 2019 14:36:33 GMT
This allows any systemd services to be added as required, with any dependency
on other services they may need.
6. Multi-stage Builds
Whilst the majority of services install packages that are required for their everyday operation, occasionally the building of a package or code needs to occur (for example when using your own code in an image, or using specific versions that may not be packaged for the base image OS being used). Dockerfile instructions make this easy to do, but it also brings with it the problem of increasing the size of a service image where, for example, source code used to build a required executable for the service is included but never used in the running service container.
Multi-stage builds offer the ability for a user to define one or more images which include all of the tools and code needed to build an executable, and then define a final image which copies that executable into it, without any of the dependencies required to build it. This results in a far smaller service image.
Change directory to the multi-stage directory in the root of this masterclass
repository, e.g.:
$ cd $BALENA_SERVICES_MASTERCLASS/multi-stageEnsure you've created a new named fleet (for example, 'Multistage')
for your balenaFin (or alternative device). Download and provision a development
device image for that fleet and flash it onto your device. If you haven't
already done so, login to your account using balena CLI with balena login and
choose an appropriate authentication method. Make a note of the UUID of the
device.
To demonstrate multistage builds, look at the
$BALENA_SERVICES_MASTERCLASS/multi-stage/Dockerfile.template file, which shows
the following:
FROM balenalib/%%BALENA_MACHINE_NAME%%-debian:buster

# Install build essential tools to include GCC
RUN install_packages build-essential

# Compile the executable from some C source
WORKDIR /usr/src/app
COPY hello-world.c ./
RUN gcc -static -o hello-world hello-world.c

CMD ["/usr/src/app/hello-world"]
This uses a Debian Buster base image and installs the appropriate build tools
(compiler, linker, headers, etc.) to build the small hello-world program.
Note that we're building a static executable here, without any dependencies
on shared libraries. This makes the final hello-world executable larger than
it otherwise would be, but it is completely self-contained.
Let's push our project code to the builders and deploy to the device:
$ balena push Multistage
[Info]     Starting build for Multistage, user heds
[Info]     Dashboard link: https://dashboard.balena-cloud.com/fleets/1525698/devices
[Info]     Building on arm03
[Info]     Pulling previous images for caching purposes...
[Success]  Successfully pulled cache images
[main]     Step 1/6 : FROM balenalib/fincm3-debian:buster
[main]      ---> 0beea2e59d1a
[main]     Step 2/6 : RUN apt-get update && apt-get install -y     build-essential     && rm -rf /var/lib/apt/lists/*
[main]      ---> Running in 52521e84561b
[main]     Get:1 http://security.debian.org/debian-security buster/updates InRelease [39.1 kB]
[main]     Get:2 http://deb.debian.org/debian buster InRelease [122 kB]
[main]     Get:3 http://deb.debian.org/debian buster-updates InRelease [49.3 kB]
[main]     Get:4 http://archive.raspberrypi.org/debian buster InRelease [25.1 kB]
[main]     Get:5 http://archive.raspbian.org/raspbian buster InRelease [15.0 kB]
[main]     Get:6 http://deb.debian.org/debian buster/main armhf Packages [7690 kB]
[main]     Get:7 http://security.debian.org/debian-security buster/updates/main armhf Packages [97.0 kB]
[main]     Get:8 http://deb.debian.org/debian buster-updates/main armhf Packages [5780 B]
[main]     Get:9 http://archive.raspberrypi.org/debian buster/main armhf Packages [259 kB]
[main]     Get:10 http://archive.raspbian.org/raspbian buster/non-free armhf Packages [103 kB]
[main]     Get:11 http://archive.raspbian.org/raspbian buster/firmware armhf Packages [1232 B]
[main]     Get:12 http://archive.raspbian.org/raspbian buster/main armhf Packages [13.0 MB]
[main]     Get:13 http://archive.raspbian.org/raspbian buster/rpi armhf Packages [1360 B]
[main]     Get:14 http://archive.raspbian.org/raspbian buster/contrib armhf Packages [58.7 kB]
[main]     Fetched 21.5 MB in 5s (4409 kB/s)
[main]     Reading package lists...
[main]     Reading package lists...
[main]     Building dependency tree...
[main]     Reading state information...
[main]     The following package was automatically installed and is no longer required:
[main]       libidn11
[main]     Use 'apt autoremove' to remove it.
[main]     The following additional packages will be installed:
[main]       binutils binutils-arm-linux-gnueabihf binutils-common bzip2 cpp cpp-8
[main]       dpkg-dev g++ g++-8 gcc gcc-8 gcc-8-base libasan5 libatomic1 libbinutils
[main]       libc-dev-bin libc6 libc6-dev libcc1-0 libdpkg-perl libgcc-8-dev libgcc1
[main]       libgomp1 libisl19 libmpc3 libmpfr6 libstdc++-8-dev libstdc++6 libubsan1
[main]       linux-libc-dev make patch xz-utils
[main]     Suggested packages:
[main]       binutils-doc bzip2-doc cpp-doc gcc-8-locales debian-keyring gcc-8-doc
[main]       libstdc++6-8-dbg gcc-multilib manpages-dev autoconf automake libtool flex
[main]       bison gdb gcc-doc libgcc1-dbg libgomp1-dbg libitm1-dbg libatomic1-dbg
[main]       libasan5-dbg liblsan0-dbg libtsan0-dbg libubsan1-dbg libmpx2-dbg
[main]       libquadmath0-dbg glibc-doc libc-l10n locales sensible-utils git bzr
[main]       libstdc++-8-doc make-doc ed diffutils-doc
[main]     Recommended packages:
[main]       fakeroot libalgorithm-merge-perl manpages manpages-dev
[main]       libfile-fcntllock-perl liblocale-gettext-perl
[main]     The following NEW packages will be installed:
[main]       binutils binutils-arm-linux-gnueabihf binutils-common build-essential bzip2
[main]       cpp cpp-8 dpkg-dev g++ g++-8 gcc gcc-8 libasan5 libatomic1 libbinutils
[main]       libc-dev-bin libc6-dev libcc1-0 libdpkg-perl libgcc-8-dev libgomp1 libisl19
[main]       libmpc3 libmpfr6 libstdc++-8-dev libubsan1 linux-libc-dev make patch
[main]       xz-utils
[main]     The following packages will be upgraded:
[main]       gcc-8-base libc6 libgcc1 libstdc++6
[main]     4 upgraded, 30 newly installed, 0 to remove and 34 not upgraded.
[main]     Need to get 40.0 MB of archives.
[main]     After this operation, 138 MB of additional disk space will be used.
[main]     Get:1 http://deb.debian.org/debian buster/main armhf bzip2 armhf 1.0.6-9.2~deb10u1 [46.7 kB]
[main]     Get:2 http://deb.debian.org/debian buster/main armhf xz-utils armhf 5.2.4-1 [181 kB]
[main]     Get:3 http://security.debian.org/debian-security buster/updates/main armhf linux-libc-dev armhf 4.19.67-2+deb10u1 [1215 kB]
[main]     Get:4 http://deb.debian.org/debian buster/main armhf libisl19 armhf 0.20-2 [455 kB]
[main]     Get:5 http://deb.debian.org/debian buster/main armhf libmpfr6 armhf 4.0.2-1 [731 kB]
[main]     Get:6 http://deb.debian.org/debian buster/main armhf libmpc3 armhf 1.1.0-1 [33.8 kB]
[main]     Get:7 http://deb.debian.org/debian buster/main armhf make armhf 4.2.1-1.2 [327 kB]
[main]     Get:8 http://deb.debian.org/debian buster/main armhf libdpkg-perl all 1.19.7 [1414 kB]
[main]     Get:9 http://archive.raspbian.org/raspbian buster/main armhf gcc-8-base armhf 8.3.0-6+rpi1 [191 kB]
[main]     Get:10 http://deb.debian.org/debian buster/main armhf patch armhf 2.7.6-3+deb10u1 [123 kB]
[main]     Get:11 http://deb.debian.org/debian buster/main armhf dpkg-dev all 1.19.7 [1773 kB]
[main]     Get:12 http://deb.debian.org/debian buster/main armhf build-essential armhf 12.6 [7568 B]
[main]     Get:13 http://archive.raspbian.org/raspbian buster/main armhf libstdc++6 armhf 8.3.0-6+rpi1 [326 kB]
[main]     Get:14 http://archive.raspbian.org/raspbian buster/main armhf libgcc1 armhf 1:8.3.0-6+rpi1 [36.5 kB]
[main]     Get:15 http://archive.raspbian.org/raspbian buster/main armhf libc6 armhf 2.28-10+rpi1 [2355 kB]
[main]     Get:16 http://archive.raspbian.org/raspbian buster/main armhf binutils-common armhf 2.31.1-16+rpi1 [2074 kB]
[main]     Get:17 http://archive.raspbian.org/raspbian buster/main armhf libbinutils armhf 2.31.1-16+rpi1 [304 kB]
[main]     Get:18 http://archive.raspbian.org/raspbian buster/main armhf binutils-arm-linux-gnueabihf armhf 2.31.1-16+rpi1 [1813 kB]
[main]     Get:19 http://archive.raspbian.org/raspbian buster/main armhf binutils armhf 2.31.1-16+rpi1 [56.9 kB]
[main]     Get:20 http://archive.raspbian.org/raspbian buster/main armhf libc-dev-bin armhf 2.28-10+rpi1 [266 kB]
[main]     Get:21 http://archive.raspbian.org/raspbian buster/main armhf libc6-dev armhf 2.28-10+rpi1 [2113 kB]
[main]     Get:22 http://archive.raspbian.org/raspbian buster/main armhf cpp-8 armhf 8.3.0-6+rpi1 [6787 kB]
[main]     Get:23 http://archive.raspbian.org/raspbian buster/main armhf cpp armhf 4:8.3.0-1+rpi2 [19.6 kB]
[main]     Get:24 http://archive.raspbian.org/raspbian buster/main armhf libcc1-0 armhf 8.3.0-6+rpi1 [37.9 kB]
[main]     Get:25 http://archive.raspbian.org/raspbian buster/main armhf libgomp1 armhf 8.3.0-6+rpi1 [64.3 kB]
[main]     Get:26 http://archive.raspbian.org/raspbian buster/main armhf libatomic1 armhf 8.3.0-6+rpi1 [8108 B]
[main]     Get:27 http://archive.raspbian.org/raspbian buster/main armhf libasan5 armhf 8.3.0-6+rpi1 [317 kB]
[main]     Get:28 http://archive.raspbian.org/raspbian buster/main armhf libubsan1 armhf 8.3.0-6+rpi1 [103 kB]
[main]     Get:29 http://archive.raspbian.org/raspbian buster/main armhf libgcc-8-dev armhf 8.3.0-6+rpi1 [595 kB]
[main]     Get:30 http://archive.raspbian.org/raspbian buster/main armhf gcc-8 armhf 8.3.0-6+rpi1 [7223 kB]
[main]     Get:31 http://archive.raspbian.org/raspbian buster/main armhf gcc armhf 4:8.3.0-1+rpi2 [5200 B]
[main]     Get:32 http://archive.raspbian.org/raspbian buster/main armhf libstdc++-8-dev armhf 8.3.0-6+rpi1 [1545 kB]
[main]     Get:33 http://archive.raspbian.org/raspbian buster/main armhf g++-8 armhf 8.3.0-6+rpi1 [7464 kB]
[main]     Get:34 http://archive.raspbian.org/raspbian buster/main armhf g++ armhf 4:8.3.0-1+rpi2 [1632 B]
[main]     debconf: delaying package configuration, since apt-utils is not installed
[main]
[main]     Fetched 40.0 MB in 4s (10.5 MB/s)
[main]     (Reading database ...
(Reading database ... 70%ase ... 5%
[main]     (Reading database ... 75%
[main]     (Reading database ... 80%
[main]     (Reading database ... 85%
[main]     (Reading database ... 90%
[main]     (Reading database ... 95%
(Reading database ... 10102 files and directories currently installed.)
[main]     Preparing to unpack .../gcc-8-base_8.3.0-6+rpi1_armhf.deb ...
[main]     Unpacking gcc-8-base:armhf (8.3.0-6+rpi1) over (8.3.0-6) ...
[main]     Setting up gcc-8-base:armhf (8.3.0-6+rpi1) ...
[main]     (Reading database ...
(Reading database ... 70%ase ... 5%
[main]     (Reading database ... 75%
[main]     (Reading database ... 80%
[main]     (Reading database ... 85%
[main]     (Reading database ... 90%
[main]     (Reading database ... 95%
(Reading database ... 10102 files and directories currently installed.)
[main]     Preparing to unpack .../libstdc++6_8.3.0-6+rpi1_armhf.deb ...
[main]     Unpacking libstdc++6:armhf (8.3.0-6+rpi1) over (8.3.0-6) ...
[main]     Setting up libstdc++6:armhf (8.3.0-6+rpi1) ...
[main]     (Reading database ...
(Reading database ... 50%ase ... 5%
(Reading database ... 70%ase ... 55%
[main]     (Reading database ... 75%
[main]     (Reading database ... 80%
[main]     (Reading database ... 85%
[main]     (Reading database ... 90%
[main]     (Reading database ... 95%
(Reading database ... 10102 files and directories currently installed.)
[main]     Preparing to unpack .../libgcc1_1%3a8.3.0-6+rpi1_armhf.deb ...
[main]     Unpacking libgcc1:armhf (1:8.3.0-6+rpi1) over (1:8.3.0-6) ...
[main]     Setting up libgcc1:armhf (1:8.3.0-6+rpi1) ...
[main]     (Reading database ...
(Reading database ... 70%ase ... 5%
[main]     (Reading database ... 75%
[main]     (Reading database ... 80%
[main]     (Reading database ... 85%
[main]     (Reading database ... 90%
[main]     (Reading database ... 95%
(Reading database ... 10102 files and directories currently installed.)
[main]     Preparing to unpack .../libc6_2.28-10+rpi1_armhf.deb ...
[main]     Unpacking libc6:armhf (2.28-10+rpi1) over (2.28-10) ...
[main]     Setting up libc6:armhf (2.28-10+rpi1) ...
[main]     Selecting previously unselected package bzip2.
[main]     (Reading database ...
(Reading database ... 40%ase ... 5%
(Reading database ... 75%ase ... 45%
[main]     (Reading database ... 80%
[main]     (Reading database ... 85%
[main]     (Reading database ... 90%
[main]     (Reading database ... 95%
(Reading database ... 10102 files and directories currently installed.)
[main]     Preparing to unpack .../00-bzip2_1.0.6-9.2~deb10u1_armhf.deb ...
[main]     Unpacking bzip2 (1.0.6-9.2~deb10u1) ...
[main]     Selecting previously unselected package xz-utils.
[main]     Preparing to unpack .../01-xz-utils_5.2.4-1_armhf.deb ...
[main]     Unpacking xz-utils (5.2.4-1) ...
[main]     Selecting previously unselected package binutils-common:armhf.
[main]     Preparing to unpack .../02-binutils-common_2.31.1-16+rpi1_armhf.deb ...
[main]     Unpacking binutils-common:armhf (2.31.1-16+rpi1) ...
[main]     Selecting previously unselected package libbinutils:armhf.
[main]     Preparing to unpack .../03-libbinutils_2.31.1-16+rpi1_armhf.deb ...
[main]     Unpacking libbinutils:armhf (2.31.1-16+rpi1) ...
[main]     Selecting previously unselected package binutils-arm-linux-gnueabihf.
[main]     Preparing to unpack .../04-binutils-arm-linux-gnueabihf_2.31.1-16+rpi1_armhf.deb ...
[main]     Unpacking binutils-arm-linux-gnueabihf (2.31.1-16+rpi1) ...
[main]     Selecting previously unselected package binutils.
[main]     Preparing to unpack .../05-binutils_2.31.1-16+rpi1_armhf.deb ...
[main]     Unpacking binutils (2.31.1-16+rpi1) ...
[main]     Selecting previously unselected package libc-dev-bin.
[main]     Preparing to unpack .../06-libc-dev-bin_2.28-10+rpi1_armhf.deb ...
[main]     Unpacking libc-dev-bin (2.28-10+rpi1) ...
[main]     Selecting previously unselected package linux-libc-dev:armhf.
[main]     Preparing to unpack .../07-linux-libc-dev_4.19.67-2+deb10u1_armhf.deb ...
[main]     Unpacking linux-libc-dev:armhf (4.19.67-2+deb10u1) ...
[main]     Selecting previously unselected package libc6-dev:armhf.
[main]     Preparing to unpack .../08-libc6-dev_2.28-10+rpi1_armhf.deb ...
[main]     Unpacking libc6-dev:armhf (2.28-10+rpi1) ...
[main]     Selecting previously unselected package libisl19:armhf.
[main]     Preparing to unpack .../09-libisl19_0.20-2_armhf.deb ...
[main]     Unpacking libisl19:armhf (0.20-2) ...
[main]     Selecting previously unselected package libmpfr6:armhf.
[main]     Preparing to unpack .../10-libmpfr6_4.0.2-1_armhf.deb ...
[main]     Unpacking libmpfr6:armhf (4.0.2-1) ...
[main]     Selecting previously unselected package libmpc3:armhf.
[main]     Preparing to unpack .../11-libmpc3_1.1.0-1_armhf.deb ...
[main]     Unpacking libmpc3:armhf (1.1.0-1) ...
[main]     Selecting previously unselected package cpp-8.
[main]     Preparing to unpack .../12-cpp-8_8.3.0-6+rpi1_armhf.deb ...
[main]     Unpacking cpp-8 (8.3.0-6+rpi1) ...
[main]     Selecting previously unselected package cpp.
[main]     Preparing to unpack .../13-cpp_4%3a8.3.0-1+rpi2_armhf.deb ...
[main]     Unpacking cpp (4:8.3.0-1+rpi2) ...
[main]     Selecting previously unselected package libcc1-0:armhf.
[main]     Preparing to unpack .../14-libcc1-0_8.3.0-6+rpi1_armhf.deb ...
[main]     Unpacking libcc1-0:armhf (8.3.0-6+rpi1) ...
[main]     Selecting previously unselected package libgomp1:armhf.
[main]     Preparing to unpack .../15-libgomp1_8.3.0-6+rpi1_armhf.deb ...
[main]     Unpacking libgomp1:armhf (8.3.0-6+rpi1) ...
[main]     Selecting previously unselected package libatomic1:armhf.
[main]     Preparing to unpack .../16-libatomic1_8.3.0-6+rpi1_armhf.deb ...
[main]     Unpacking libatomic1:armhf (8.3.0-6+rpi1) ...
[main]     Selecting previously unselected package libasan5:armhf.
[main]     Preparing to unpack .../17-libasan5_8.3.0-6+rpi1_armhf.deb ...
[main]     Unpacking libasan5:armhf (8.3.0-6+rpi1) ...
[main]     Selecting previously unselected package libubsan1:armhf.
[main]     Preparing to unpack .../18-libubsan1_8.3.0-6+rpi1_armhf.deb ...
[main]     Unpacking libubsan1:armhf (8.3.0-6+rpi1) ...
[main]     Selecting previously unselected package libgcc-8-dev:armhf.
[main]     Preparing to unpack .../19-libgcc-8-dev_8.3.0-6+rpi1_armhf.deb ...
[main]     Unpacking libgcc-8-dev:armhf (8.3.0-6+rpi1) ...
[main]     Selecting previously unselected package gcc-8.
[main]     Preparing to unpack .../20-gcc-8_8.3.0-6+rpi1_armhf.deb ...
[main]     Unpacking gcc-8 (8.3.0-6+rpi1) ...
[main]     Selecting previously unselected package gcc.
[main]     Preparing to unpack .../21-gcc_4%3a8.3.0-1+rpi2_armhf.deb ...
[main]     Unpacking gcc (4:8.3.0-1+rpi2) ...
[main]     Selecting previously unselected package libstdc++-8-dev:armhf.
[main]     Preparing to unpack .../22-libstdc++-8-dev_8.3.0-6+rpi1_armhf.deb ...
[main]     Unpacking libstdc++-8-dev:armhf (8.3.0-6+rpi1) ...
[main]     Selecting previously unselected package g++-8.
[main]     Preparing to unpack .../23-g++-8_8.3.0-6+rpi1_armhf.deb ...
[main]     Unpacking g++-8 (8.3.0-6+rpi1) ...
[main]     Selecting previously unselected package g++.
[main]     Preparing to unpack .../24-g++_4%3a8.3.0-1+rpi2_armhf.deb ...
[main]     Unpacking g++ (4:8.3.0-1+rpi2) ...
[main]     Selecting previously unselected package make.
[main]     Preparing to unpack .../25-make_4.2.1-1.2_armhf.deb ...
[main]     Unpacking make (4.2.1-1.2) ...
[main]     Selecting previously unselected package libdpkg-perl.
[main]     Preparing to unpack .../26-libdpkg-perl_1.19.7_all.deb ...
[main]     Unpacking libdpkg-perl (1.19.7) ...
[main]     Selecting previously unselected package patch.
[main]     Preparing to unpack .../27-patch_2.7.6-3+deb10u1_armhf.deb ...
[main]     Unpacking patch (2.7.6-3+deb10u1) ...
[main]     Selecting previously unselected package dpkg-dev.
[main]     Preparing to unpack .../28-dpkg-dev_1.19.7_all.deb ...
[main]     Unpacking dpkg-dev (1.19.7) ...
[main]     Selecting previously unselected package build-essential.
[main]     Preparing to unpack .../29-build-essential_12.6_armhf.deb ...
[main]     Unpacking build-essential (12.6) ...
[main]     Setting up binutils-common:armhf (2.31.1-16+rpi1) ...
[main]     Setting up linux-libc-dev:armhf (4.19.67-2+deb10u1) ...
[main]     Setting up libgomp1:armhf (8.3.0-6+rpi1) ...
[main]     Setting up bzip2 (1.0.6-9.2~deb10u1) ...
[main]     Setting up libasan5:armhf (8.3.0-6+rpi1) ...
[main]     Setting up make (4.2.1-1.2) ...
[main]     Setting up libmpfr6:armhf (4.0.2-1) ...
[main]     Setting up xz-utils (5.2.4-1) ...
[main]     update-alternatives: using /usr/bin/xz to provide /usr/bin/lzma (lzma) in auto mode
[main]     update-alternatives: warning: skip creation of /usr/share/man/man1/lzma.1.gz because associated file /usr/share/man/man1/xz.1.gz (of link group lzma) doesn't exist
[main]     update-alternatives: warning: skip creation of /usr/share/man/man1/unlzma.1.gz because associated file /usr/share/man/man1/unxz.1.gz (of link group lzma) doesn't exist
[main]     update-alternatives: warning: skip creation of /usr/share/man/man1/lzcat.1.gz because associated file /usr/share/man/man1/xzcat.1.gz (of link group lzma) doesn't exist
[main]     update-alternatives: warning: skip creation of /usr/share/man/man1/lzmore.1.gz because associated file /usr/share/man/man1/xzmore.1.gz (of link group lzma) doesn't exist
[main]     update-alternatives: warning: skip creation of /usr/share/man/man1/lzless.1.gz because associated file /usr/share/man/man1/xzless.1.gz (of link group lzma) doesn't exist
[main]     update-alternatives: warning: skip creation of /usr/share/man/man1/lzdiff.1.gz because associated file /usr/share/man/man1/xzdiff.1.gz (of link group lzma) doesn't exist
[main]     update-alternatives: warning: skip creation of /usr/share/man/man1/lzcmp.1.gz because associated file /usr/share/man/man1/xzcmp.1.gz (of link group lzma) doesn't exist
[main]     update-alternatives: warning: skip creation of /usr/share/man/man1/lzgrep.1.gz because associated file /usr/share/man/man1/xzgrep.1.gz (of link group lzma) doesn't exist
[main]     update-alternatives: warning: skip creation of /usr/share/man/man1/lzegrep.1.gz because associated file /usr/share/man/man1/xzegrep.1.gz (of link group lzma) doesn't exist
[main]     update-alternatives: warning: skip creation of /usr/share/man/man1/lzfgrep.1.gz because associated file /usr/share/man/man1/xzfgrep.1.gz (of link group lzma) doesn't exist
[main]     Setting up libmpc3:armhf (1.1.0-1) ...
[main]     Setting up libatomic1:armhf (8.3.0-6+rpi1) ...
[main]     Setting up patch (2.7.6-3+deb10u1) ...
[main]     Setting up libdpkg-perl (1.19.7) ...
[main]     Setting up libubsan1:armhf (8.3.0-6+rpi1) ...
[main]     Setting up libisl19:armhf (0.20-2) ...
[main]     Setting up libbinutils:armhf (2.31.1-16+rpi1) ...
[main]     Setting up cpp-8 (8.3.0-6+rpi1) ...
[main]     Setting up libc-dev-bin (2.28-10+rpi1) ...
[main]     Setting up binutils-arm-linux-gnueabihf (2.31.1-16+rpi1) ...
[main]     Setting up libcc1-0:armhf (8.3.0-6+rpi1) ...
[main]     Setting up binutils (2.31.1-16+rpi1) ...
[main]     Setting up dpkg-dev (1.19.7) ...
[main]     Setting up libgcc-8-dev:armhf (8.3.0-6+rpi1) ...
[main]     Setting up cpp (4:8.3.0-1+rpi2) ...
[main]     Setting up libc6-dev:armhf (2.28-10+rpi1) ...
[main]     Setting up libstdc++-8-dev:armhf (8.3.0-6+rpi1) ...
[main]     Setting up gcc-8 (8.3.0-6+rpi1) ...
[main]     Setting up gcc (4:8.3.0-1+rpi2) ...
[main]     Setting up g++-8 (8.3.0-6+rpi1) ...
[main]     Setting up g++ (4:8.3.0-1+rpi2) ...
[main]     update-alternatives: using /usr/bin/g++ to provide /usr/bin/c++ (c++) in auto mode
[main]     Setting up build-essential (12.6) ...
[main]     Processing triggers for libc-bin (2.28-10) ...
[main]     Removing intermediate container 52521e84561b
[main]      ---> 6334656f829e
[main]     Step 3/6 : WORKDIR /usr/src/app
[main]      ---> Running in dc113964f767
[main]     Removing intermediate container dc113964f767
[main]      ---> 0287888d4141
[main]     Step 4/6 : COPY hello-world.c ./
[main]      ---> 11f9f1d9da8c
[main]     Step 5/6 : RUN gcc -static -o hello-world hello-world.c
[main]      ---> Running in e92cb78d6502
[main]     Removing intermediate container e92cb78d6502
[main]      ---> 0a17bcb078d1
[main]     Step 6/6 : CMD ["/usr/src/app/hello-world"]
[main]      ---> Running in f8fcb26e2c31
[main]     Removing intermediate container f8fcb26e2c31
[main]      ---> 161f2f5f05c4
[main]     Successfully built 161f2f5f05c4
[Info]     Uploading images
[Success]  Successfully uploaded images
[Info]     Built on arm03
[Success]  Release successfully created!
[Info]     Release: 765b3397180a2a9dfa2557b52383c020 (id: 1101927)
[Info]     ┌─────────┬────────────┬────────────┐
[Info]     │ Service │ Image Size │ Build Time │
[Info]     ├─────────┼────────────┼────────────┤
[Info]     │ main    │ 275.19 MB  │ 34 seconds │
[Info]     └─────────┴────────────┴────────────┘
[Info]     Build finished in 1 minute, 6 seconds
                \
                 \
                  \\
                   \\
                    >\/7
                _.-(6'  \
               (=___._/` \
                    )  \ |
                   /   / |
                  /    > /
                 j    < _\
             _.-' :      ``.
             \ r=._\        `.
            <`\\_  \         .`-.
             \ r-7  `-. ._  ' .  `\
              \`,      `-.`7  7)   )
               \/         \|  \'  / `-._
                          ||    .'
                           \\  (
                            >\  >
                        ,.-' >.'
                       <.'_.''
                         <'
As you can see, a lot of dependencies were installed to be able to build our executable program.
Now wait for the device to download and run the project, and then SSH into
the device. We want to see how big our service image, which is just printing
Hello, world! and then exiting, is:
$ balena ssh 1234567
root@1234567:~# balena images | grep registry2
registry2.balena-cloud.com/v2/d84f78e591f230e4b5c9f20b00123456   <none>              2845b9f1a3fe        13 minutes ago      289MB
For a project of a couple of lines, 289MB is rather a large image size!
However, we can do better than this. Whilst Debian's an excellent base for
carrying out compilation and building of packages from source, if you're trying
to run a very slimline service, there are better choices. What we could do is
use a very small Alpine Linux base image for our service, and just copy our
standalone hello-world executable into it instead (which is why we statically
linked it).
Multi-stage builds allow you to use one base image as the basis for building all
your code, and another base image to actually run as a fleet's service.
To do this, we add a few parameters to the FROM instructions to give them a
name, and then use the --from switches to the COPY instruction to copy files
from one image to another. By doing this, we can build our executable in an
image that includes all the tools we need to do so, then copy that executable
into a different, smaller image that will act as our service.
Modify the Dockerfile.template initial FROM line from:
FROM balenalib/%%BALENA_MACHINE_NAME%%-debian:busterto
FROM balenalib/%%BALENA_MACHINE_NAME%%-debian:buster as buildThis informs the builder that all instructions up to the next FROM
instruction relate to an image that can be referenced in the same file as
build. Now remove the CMD line at the end of the file, and add the following
instead:
FROM balenalib/%%BALENA_MACHINE_NAME%%-alpine:3.8

# Change workdir and then copy the hello-world executable from the build image
# into this one
WORKDIR /usr/src/app
COPY --from=build /usr/src/app/hello-world ./

# Start the executable!
CMD ["/usr/src/app/hello-world"]
We've now defined a second image that will be used as the actual service. The
final image in a Dockerfile, defined by FROM, will always be the image used
as the service. As you can see, we copy the compiled executable from the
build image, referenced by the --from=build switch, into the final service
image. Finally, the command to run the self-contained executable is made.
Now push the project again with the modified Dockerfile:
$ balena push Multistage
[Info]     Starting build for Multistage, user heds
[Info]     Dashboard link: https://dashboard.balena-cloud.com/fleets/1525698/devices
[Info]     Building on arm03
[Info]     Pulling previous images for caching purposes...
[Success]  Successfully pulled cache images
[main]     Step 1/9 : FROM balenalib/fincm3-debian:buster as build
[main]      ---> 0beea2e59d1a
[main]     Step 2/9 : RUN apt-get update && apt-get install -y     build-essential     && rm -rf /var/lib/apt/lists/*
[main]     Using cache
[main]      ---> b4555e4d0388
[main]     Step 3/9 : WORKDIR /usr/src/app
[main]     Using cache
[main]      ---> ee558a8933a3
[main]     Step 4/9 : COPY hello-world.c ./
[main]     Using cache
[main]      ---> cfd1883b59c6
[main]     Step 5/9 : RUN gcc -static -o hello-world hello-world.c
[main]     Using cache
[main]      ---> a4f6bd3a1d95
[main]     Step 6/9 : FROM balenalib/fincm3-alpine:3.8
[main]      ---> d2594470811f
[main]     Step 7/9 : WORKDIR /usr/src/app
[main]      ---> Running in 86b628dd1189
[main]     Removing intermediate container 86b628dd1189
[main]      ---> 60819d1d84d5
[main]     Step 8/9 : COPY --from=build /usr/src/app/hello-world ./
[main]      ---> 18f950f7c501
[main]     Step 9/9 : CMD ["/usr/src/app/hello-world"]
[main]      ---> Running in eb398f518fc7
[main]     Removing intermediate container eb398f518fc7
[main]      ---> 5d0de84fe0f7
[main]     Successfully built 5d0de84fe0f7
[Info]     Uploading images
[Success]  Successfully uploaded images
[Info]     Built on arm03
[Success]  Release successfully created!
[Info]     Release: 1d0b5ffc59cbd4dc2c59dcfd1839232c (id: 1101963)
[Info]     ┌─────────┬────────────┬────────────┐
[Info]     │ Service │ Image Size │ Build Time │
[Info]     ├─────────┼────────────┼────────────┤
[Info]     │ main    │ 38.07 MB   │ 2 seconds  │
[Info]     └─────────┴────────────┴────────────┘
[Info]     Build finished in 24 seconds
                \
                 \
                  \\
                   \\
                    >\/7
                _.-(6'  \
               (=___._/` \
                    )  \ |
                   /   / |
                  /    > /
                 j    < _\
             _.-' :      ``.
             \ r=._\        `.
            <`\\_  \         .`-.
             \ r-7  `-. ._  ' .  `\
              \`,      `-.`7  7)   )
               \/         \|  \'  / `-._
                          ||    .'
                           \\  (
                            >\  >
                        ,.-' >.'
                       <.'_.''
                         <'
Even though we've changed the initial FROM line, you can see that as it's
a build-time reference, the cache was still used for the rest of the steps!
Now wait for the updated project to download and restart. Then SSH into the device again:
$ balena ssh 1234567
root@1234567:~# balena images | grep registry2
registry2.balena-cloud.com/v2/9786f6bfe803b9ae6643a54a52123457   <none>              5d0de84fe0f7        2 minutes ago       39.9MB
Now our service is only 39.9MB in size, as opposed to the 289MB it was originally, over seven times smaller!
Using multi-stage builds when building services that need to do their own packaging and building of components can create a huge space saving that allows you to add more services than would otherwise be possible.
There's more information on multi-stage builds here.
Conclusion
In this masterclass, you've learned how balena services are defined, both as single service and multicontainer fleets, as well as methodologies that are associated with them. You should now be confident enough to:
- Create single service and multicontainer fleets
- Know the difference between
hostandbridgenetworking and when to use them - Be able to build and run
systemdin a service - Know when to use multi-stage builds to decrease a service image's size