
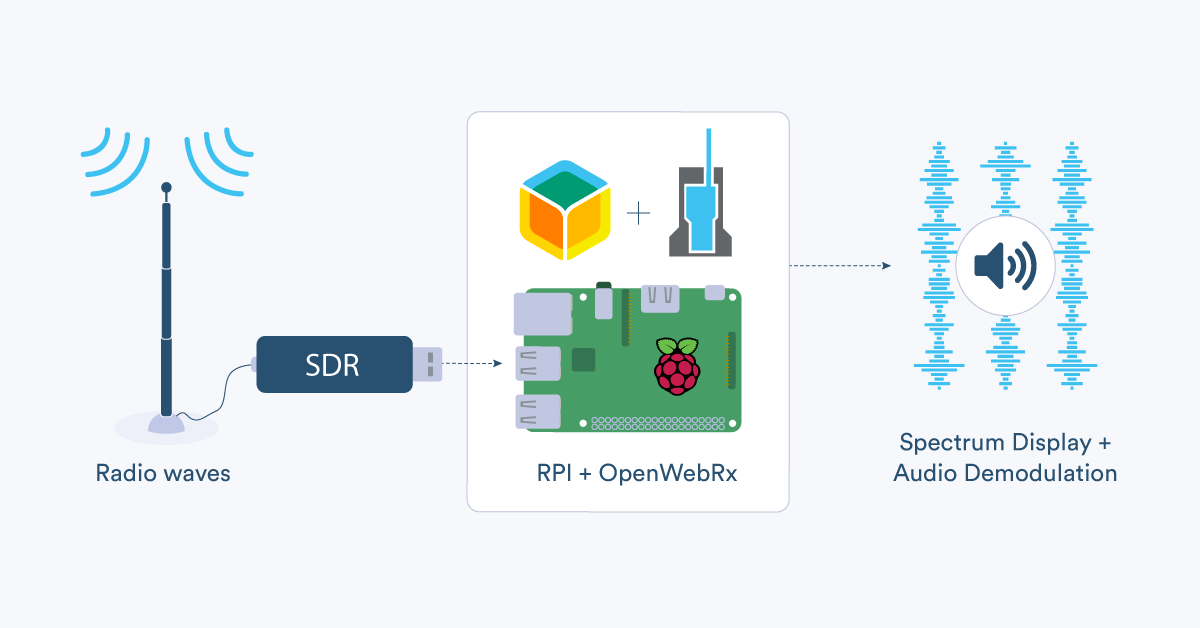
Combine a Raspberry Pi and an inexpensive SDR (Software-Defined Radio) dongle to create a remote monitoring device that you can place anywhere in the world (with internet access) to view the surrounding radio spectrum and stream audio from some of the detected signals.
It hosts a small web server which one or more users can browse into to view a customizable page containing a real time display of the received broadcasts.
Some background on SDR
What is SDR?
SDR involves eliminating much of the hardware and circuitry that a traditional radio utilizes and implementing it in software. As an over-simplified example, we know that AM/FM radios, WiFi access points, Z-Wave gateways, and police scanners are all types of radios however they are usually built with very different hardware. But what if you could implement all of these (and more) in one device, only utilizing the small amount of hardware they have in common, namely a tuner? An SDR device and a computer allow this to happen and provide a near-universal radio system.
The RTL-SDR discovery
While the concept of SDR has been around for a few decades, it was only in the last 10 years or so that price and performance gains have made it accessible to the hobbyist and experimenter. That’s when it was discovered that \$25 USB TV Tuner sticks based on the Realtek RTL2832U chip could easily be reverse-engineered to act as an inexpensive software defined radio.
Since then, these USB sticks have been used in many hobbyist and professional projects previously too complex to implement with traditional radio hardware. Just a few examples include tracking airplanes with ADS-B, sniffing automobile keyfobs, and decoding weather satellite images.
Enter OpenWebRX
When SDR became within reach of a wider audience, some great open source projects were introduced to take advantage of the technology. One of these is OpenWebRX by András Retzler. It’s a remote spectrum monitoring solution that was originally designed for the amateur radio community but it’s also a great starter project for using an RTL-SDR with the Raspberry Pi and balena. It uses a “waterfall display” to show the signals received across the frequency range over time.

We are going to use balena to augment some of the features of OpenWebRX. First, we will utilize the balena public URL feature to provide a simple, secure path for remote access to the local OpenWebRX web page your device will host. This prevents you from having to deal with router forwarding, dynamic DNS or secure certificates. It also means you can relocate your Pi anywhere with internet access and it will be accessible via the same URL.
Using balena’s application download feature allows us to create a headless install that can be replicated easily on a fleet of these devices if so desired. Finally, we’ll use the device configuration feature to make it easy to change OpenWebRX environment variables using the balenaCloud dashboard.
Getting Started
You’ll need the following hardware:
- A Raspberry Pi, preferably a 3B+ or 4, but nothing less than a Raspberry Pi 2.
- A 16GB microSD card or larger (We recommend using SanDisk Extreme Pro for best results)
- An RTL-SDR based USB dongle. Good results have been obtained using the RTL-SDR.COM V3 but any dongle based on this chip will do. They range from $15 – $30 (beware of potentially poor performance from very cheap dongles!)
- An antenna suitable for picking up signals in the frequency range you want to monitor with the appropriate connector for your SDR dongle. (Some of the dongle kits linked above include an antenna that reasonably covers many frequencies.)
We’ve set up a GitHub repository that will download and install OpenWebRX and its dependencies, so the only requirements are:
- A tool to flash your SD card such as balenaEtcher
- A free balenaCloud account
- A clone or download of this project from GitHub
Setting up
First let’s set up the Raspberry Pi. Plug the SDR USB dongle into any one of the USB ports on the Pi then connect the antenna.

Now it’s time to install the software using balenaCloud. The basic steps are below, but if you need more detailed instructions, our getting started tutorial is available. If you’re using these docs, Instead of using the instructions to push the “FirstApp” example, follow the example further below to download and push the sdr-spectrum-monitor project.
- Log into your balenaCloud account and create a new application from the dashboard.
- Add a device and download the balenaOS disk image from the dashboard. You can enter your WiFi details at this point if you wish so that your device can connect to the internet once it boots up.
- Flash your SD card (we recommend using balenaEtcher) with the balenaOS image, insert it into your Raspberry Pi and power it up. After a minute or so, it should connect to the internet and show up on your balenaCloud dashboard.

Once the device is connected and showing on the dashboard, you can deploy the project code.
- Download or clone the project to your local computer
- Use the balenaCLI to push the application to your device
If all went well, you should shortly see the balena unicorn and the code you’ve just pushed will be automatically distributed to the device(s) in your application.

To access your spectrum monitor on your local network, enter the IP address (found on your device dashboard) followed by :8073 (the default port number.) For instance, in the example above, you would browse to https://192.168.1.147:8073 to access your monitor. If everything is running correctly you should see a waterfall display and a play button. Click on the play button to start monitoring the default spectrum centered at 144.25 MHz. (You can change the port and the center frequency using environment variables in the balenaCloud dashboard as described below.)

The waterfall display shows any detected signals in a highlighted color. Click on a signal to listen to the audio, if available. You may need to try switching the type of demodulation (such as AM, FM, etc…) using the buttons on the lower right of the display to hear proper audio.

Keep in mind that many signals are merely data transmissions which will sound garbled when represented as audio. If you are just looking to see what frequencies are in use and what their waveforms look like, the waterfall display alone can be very helpful. For more details on using OpenWebRX, see its project page or this document.
If you want to access your spectrum monitor from outside your network, you’ll need to change the port to 80 and enable the public URL feature in balenaCloud. Select your device in the dashboard and then click on the “D(x) Device Variables” button on the left, then the “+ Add variable” button near the top. In the “Add variable” popup, for “NAME” enter ORX_WEB_PORT and then enter a numeric port value for “VALUE” and click “Add” to save the new setting. The application will restart and then the new port will be active. Once you enable the “PUBLIC DEVICE URL” feature by clicking the switch, a link with an arrow will appear that opens a new browser tab. That is the URL anyone can use to access your monitor! (Only share it with those who you want to allow access to your monitor).


The RTL-SDR has a bandwidth of 2.4 MHz so that is the maximum amount of spectrum you can view at one time. You can set a “center frequency” which will be the mid point of the display with 1.2 MHz of spectrum viewable on either side. To change the center frequency, add or modify the device variable named ORX_CENTER_FREQ with a numeric value in Hz containing no commas or decimals. For instance, if you want a center frequency at 121.45 MHz you would enter 121450000 for the value.
Here are a few more device variables you can set on this project:
plaintext

ORX_SAMP_RATE - sampling rate (default is 2400000 which is the max for the RTL-SDR)

ORX_MAX_CLIENTS - Maximum number of clients that can connect at once (default is 20)

ORX_NAME - Name to display on your spectrum page

ORX_LOCATION - Location to display on your spectrum page
Note that any time you add or change an environment variable, it will restart the application and disconnect any users currently on your page. If you are looking for things to listen to, try doing a web search for “scanner frequencies in location” (replacing “location” with the device’s physical locale). Since the software does not demodulate “wideband FM” you won’t be able to stream/listen to broadcast band FM radio (although you can view their waveforms).
However with the proper antenna, you should be able to receive shortwave, amateur radio, public services, aircraft radio communications and much more. Note: Depending on your location, listening in to some radio signals may not be legal. It is your responsibility to check before tuning in.
How it works
The project uses the RTL-SDR library to read raw data from the SDR dongle. The author has written a web server in Python (openwebrx.py) that uses websockets to send the audio and waterfall data to the client after demodulating the raw data from the SDR. Javascript is used by the client for all of the interactive features. Many more details are available in this document.
Our version of this project uses a Dockerfile to build the required environment to run OpenWebRX and then downloads the project from GitHub and installs it in the container which is then run on balenaOS.
Next steps
You’ll notice that we have replaced the OpenWebRX configuration file with one of our own named config_alt.py and that is the best place to start if you want to customize the program even further. It is a very well-commented Python file. Look it over, make some changes, then re-push the code to your application. An easy way to start would be to add more environmental variables to control the configuration.
Unfortunately the author of OpenWebRX has recently discontinued any further development on the project. However, many people have forked it and are adding new features and improvements. You could try using one of these versions as the base of this project, or fork it yourself and start experimenting.
Try building multiple projects on one device
If you’ve already built one of our projects and want to try this one too, good news! One of the great benefits of building with balena is that you can easily add more projects to the same device without needing to buy more hardware. This blog post explains how to do just that: learn how to set up this project alongside what you’ve built already. Happy hacking!
Give it a try
It’s time to build your own remote radio monitor! Give this project a try– we’d love to hear how it goes. If you get stuck or have any questions, let us know in our forums. You can also sound off on project wins, questions, or feedback on our Twitter, on Instagram, or on Facebook.