
We’ll show you a simplified overview of computer vision and deep learning, and the easiest way to get started using balenaOS and alwaysAI. This guide combines the powers of balena with alwaysAI’s platform to get a project up and running quickly on the NVIDIA Jetson Nano. Go from “zero” to “AI hero” in just a blog post!
Computer vision and deep learning can be a daunting endeavor. Before thinking about application development, there are numerous concepts you need to understand and a lot of time-consuming tasks you need to perform just to get your environment to the right state. GPU drivers, acceleration, runtimes, neural networks, frameworks, models, etc. It gets messy very quickly… but fear not, we’ve got you covered!
Before you start
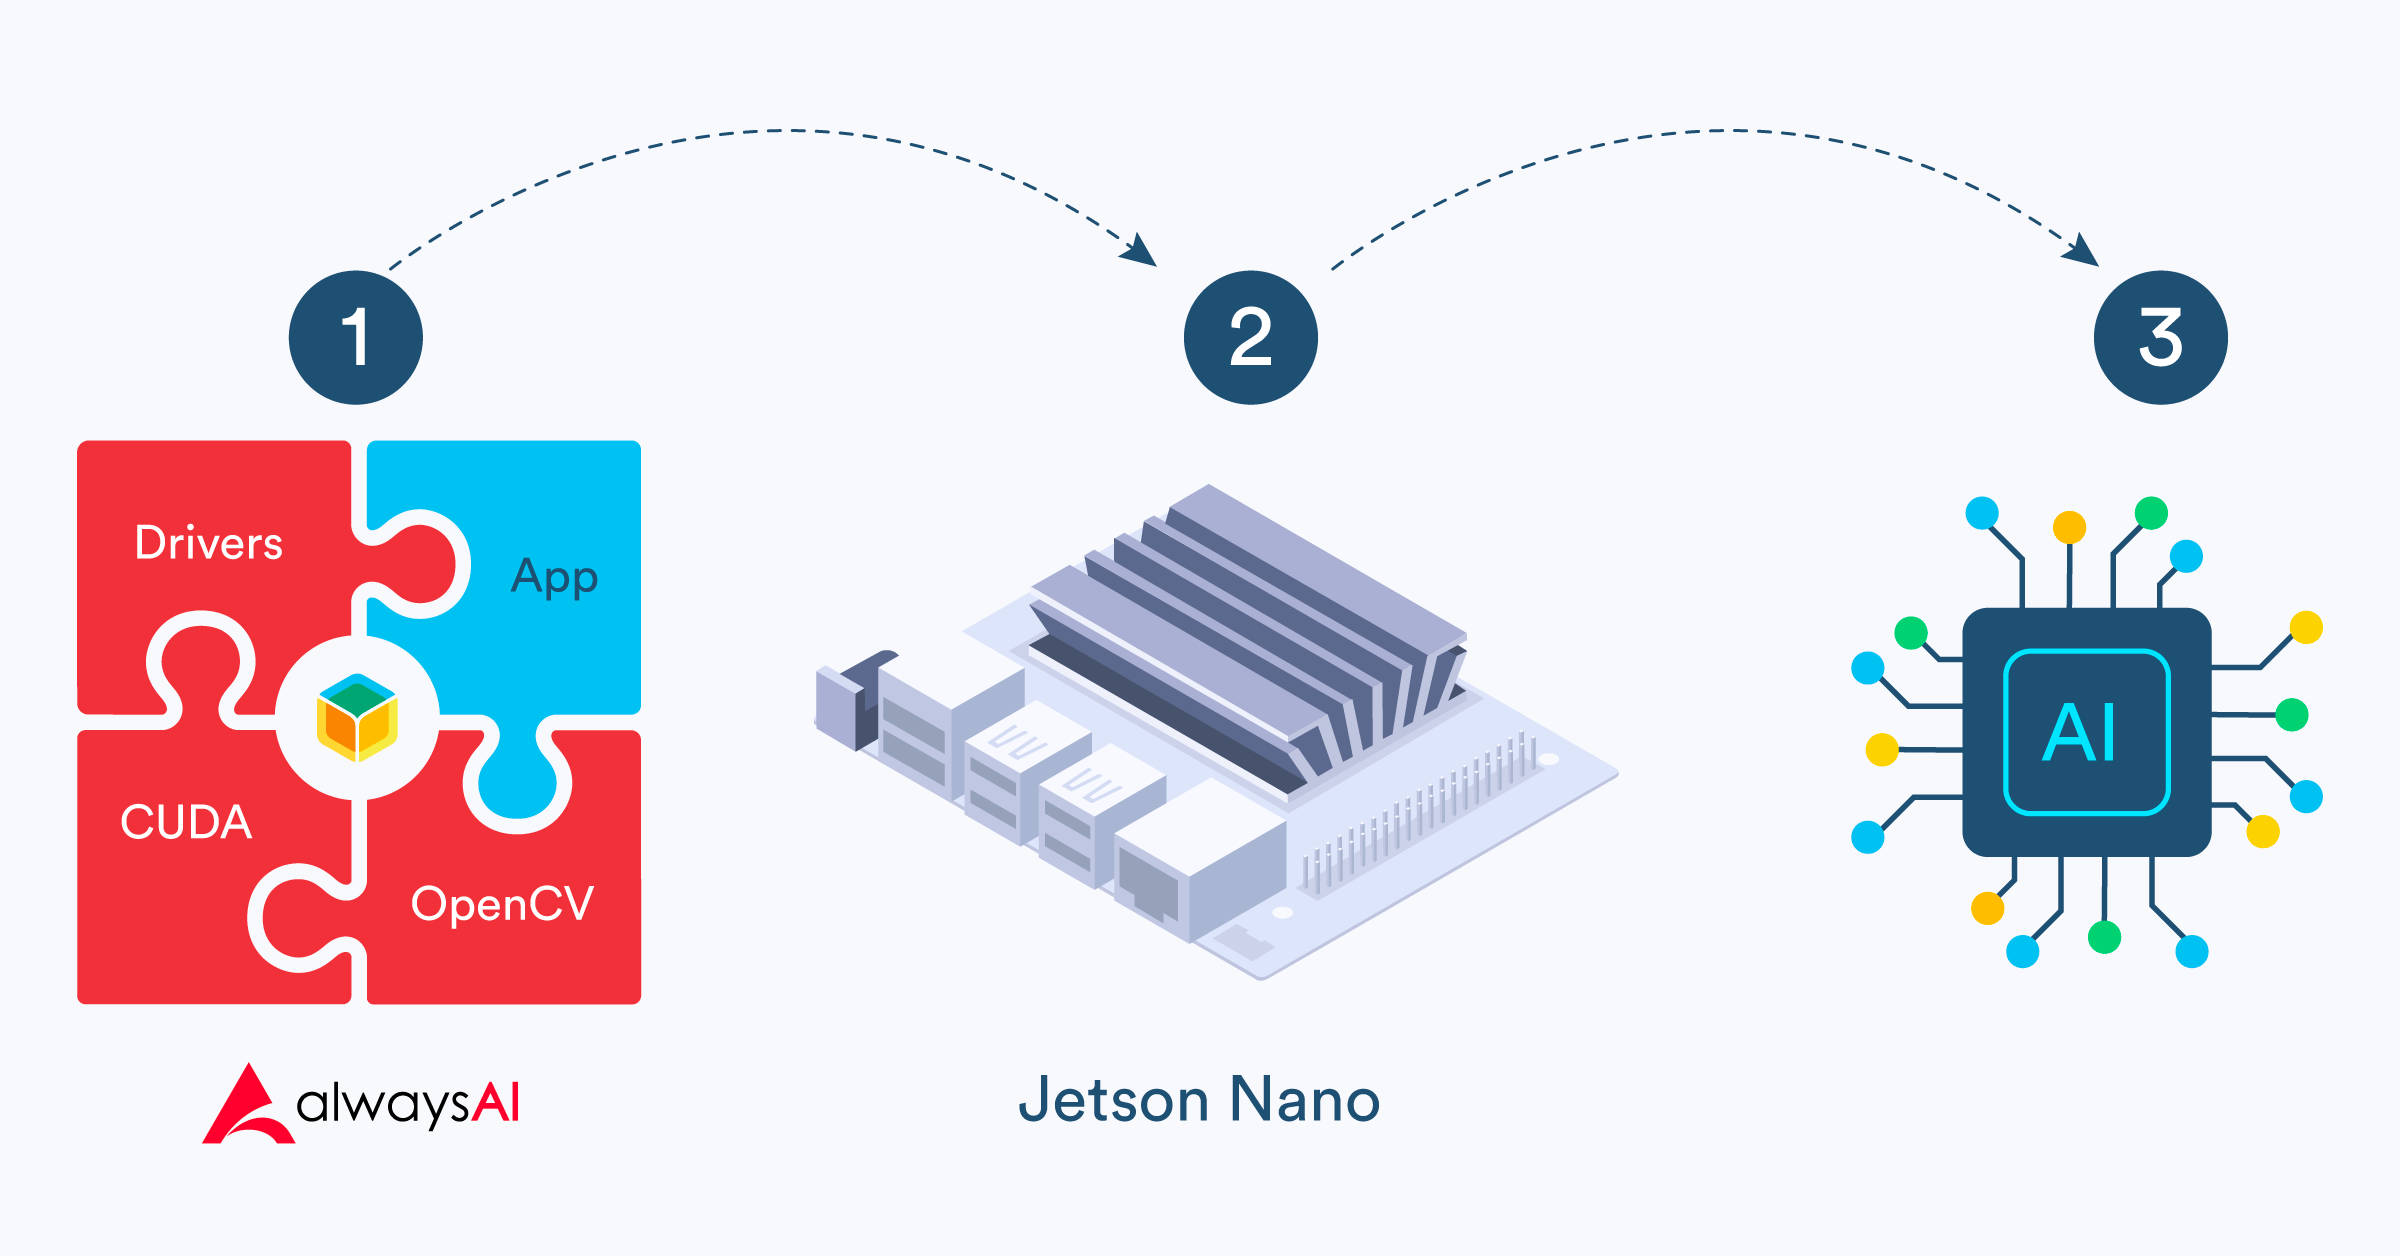
Concepts overview: the software layers
Let’s briefly go over the pieces that enable us to crunch AI algorithms using a GPU with little to no effort. From the GPU itself all the way to frameworks, there are many software layers involved and each one has multiple ways of installing and configuring; most are a lot more complex than they should be, so don’t get too excited as we won’t be doing any manual work.

Note: Since the Jetson Nano is the entry-level board, it will be the main focus of this project. Though any Jetson product should operate in the same way (and even other products like Intel Movidius sticks too in a broader sense, though your mileage may vary).
NVIDIA GPU drivers: L4T Driver Package
The Jetson Nano features an NVIDIA Tegra X1 SoC, combining CPU, GPU and memory in one chip. Our first order of business is to get linux drivers for this chipset, without these balenaOS won’t be able to make use of the GPU.
NVIDIA CUDA (Compute Unified Device Architecture)
CUDA is a parallel computing platform created by NVIDIA that allows developers to use the GPU for general purpose processing, in short it allows you to take advantage of a GPU’s parallel capabilities for the execution of mathematical computations or algorithms without spending time writing low level GPU code. CUDA libraries work with most programming languages, and even if you don’t plan on directly using any of them, the chances are your framework of choice will.
NVIDIA cuDNN (CUDA Deep Neural Network)
Our next software layer is directly built on top of CUDA. cuDNN is a library that provides highly tuned implementations for standard routines used by deep neural networks. Very much like CUDA, cuDNN primitives allow developers to focus on training neural networks and developing applications, rather than spending time on low-level GPU performance tuning. And again, it can be used to accelerate all of the popular deep learning frameworks even if you don’t use it yourself.
Neural Network / Deep learning frameworks
Moving on we arrive at the neural network framework layer. These frameworks offer building blocks for designing, training and validating neural network models, through a high level programming interface.
A neural network is a system that learns to perform a task by considering examples, usually without being specifically programmed to do so. Neural networks take inputs and perform a series of computational calculations using adjustable weights before generating a prediction. During the training process, these weights are adjusted to find patterns in order to make optimal predictions against a sample dataset that has known results. Frameworks provide tools to facilitate this model training or building process.
These models usually rely on GPU-accelerated libraries (such as cuDNN) to deliver high-performance multi-GPU accelerated training. Some of today’s most popular frameworks are TensorFlow, PyTorch, Keras, Caffe, and DarkNet.
Neural network models and datasets
Models are what is actually run by the neural network. You can build your own or use a vast number of already pre-built models. Models vary in what they can do: detect objects, classify them, estimate human pose, etc.
Training a model is a complex process that requires a deep understanding of its inner workings and is a very time consuming process, so pre-built models are usually a better starting point for beginners. Training a model usually requires a large set of data, for example for object classification you would need thousands of images for each object you want to classify. Getting the right amount of quality data can be difficult so there are predefined sets of data known as datasets that are available. These datasets can be used to work with the most common objects, though if you need them fine tuned for a particular set of objects you will need to train your own.
alwaysAI simplifies some of these challenges
As you can see, working with neural network frameworks is not easy. Each layer we described has many ways of going about it, and there are multiple alternatives and options to choose from. The remainder of this guide will focus on the first three layers, so everything related to GPU drivers, CUDA and cuDNN. (Stay tuned for an upcoming post centered on the two last layers!)
Before we go any further, note that we recently published a guide that covers these exact steps the “manual” way; the guide walks you through everything needed to build a docker image that contains all the necessary software packages to get an image that can run CUDA, cuDNN and even OpenCV code. If you are interested in the details, you can check it out here.
In this guide we will be taking an alternative route that involves using alwaysAI. AlwaysAI is a very powerful AI platform, it provides tools that make a developer’s life easier, enabling you to focus on your application and not on the setup (installing and configuring all the software layers we previously talked about). alwaysAI provides pre-built docker images that include CUDA, cuDNN and OpenCV installed out of the box. This is extremely helpful and time saving since manually installing those tools can be a very involved process.
Here is the one-liner that will give you NVIDIA GPU drivers, CUDA, cuDNN and OpenCV installed, configured and ready to go in your container:
dockerfile

FROM alwaysai/edgeiq:nano-0.11.0
And that’s it! As long as you use alwaysAI’s edgeIQ image as your base image you are good to go. Your container is now ready to take full advantage of the GPU.
Note: alwaysAI is in open beta, you can register here. We used the latest version of alwaysAI’s edgeIQ image (0.11.0) for this project. Please review the alwaysAI documentation for the latest references.
Tutorial
In this short tutorial we’ll walk you through the required steps to deploy a sample application that ships an AI-ready base container. We won’t be covering neural network frameworks yet, for that you’ll need to check the upcoming part 2 of this series.
Hardware required
For this first part you’ll need the following:
- Jetson Nano Developer Kit
- A micro SD card (we recommend at least 16GB Sandisk Extreme Pro)
- An ethernet cable
- A DC barrel jack power supply with 5.5mm OD / 2.1mm ID / 9.5mm length, center pin positive that can supply up to 5V⎓4A (AliExpress, Adafruit)
- A motherboard jumper to short J48 on the Jetson Nano
Optional: The Jetson Nano does not have onboard WiFi, so you can also get a WiFi USB dongle for extra convenience (Amazon, Ali Express), or even use the Nano’s M.2 slot to install a WiFi card (Amazon).
Software required
- A download of this sample project from GitHub
- Software to flash an SD card (such as balenaEtcher)
- A free balenaCloud account to setup and manage the Jetson Nano
- Download and install the balena CLI tools – to be installed on your computer, allowing us to install the project code on the Nano
Power supply considerations
Note that while you can power the Nano via USB cable you will need a good quality power supply that can deliver at least 5V⎓2A at the developer kit’s Micro-USB port. But, even this won’t be anywhere near as much current as the board will need when running stressful workloads in the default 10W power mode. If your board is unexpectedly shutting down it’s a big sign of power starvation.
To be on the safe side you need to provide 5V⎓4A by using a DC barrel jack power supply. You’ll need to fit a jumper to J48 header on the baseboard in order to enable DC power supply usage. For a more detailed explanation on this please check out this reference guide by Nvidia.
Provision the Jetson Nano
Create a balenaCloud application
The first thing we need to do is to create a balena application to manage the Jetson Nano. If you don’t already have a balena account, make sure to sign up before continuing.
From balenaCloud’s dashboard you need to click on the “Create application” button. An application is a group of devices that share the same architecture and run the same code. We need to create an application with Jetson Nano as the Default Device Type.
Add a device and download the balenaOS disk image
Once the application is created, we need to add a device to it. To do that just click on the “Add device” button and fill in the form. If you’ll be connecting the Nano via WiFi using a USB dongle make sure you set the WiFi SSID and password. Otherwise remember to connect an ethernet cable to the board. This process creates a customized balenaOS disk image, download it before continuing.
Flash the SD card and boot the device
Once the disk image is downloaded, you need to flash it into an SD card. We recommend using balenaEtcher to do so. Finally, insert the SD card into the board slot, connect the ethernet cable or WiFi dongle, and power up the device. The location of the SD card slot is a bit tricky on the Jetson Nano:

After a few minutes you should see the device appear in your dashboard:

If that is not the case, it’s likely something has gone wrong. Our extensive troubleshooting guide can help you figure it out, if not, come over to the forums and let us know.
Deploy sample project
Get the sample project code
We are going to deploy a very simple container project that is based on alwaysAI’s edeIQ image. To do so, grab the project from our GitHub repository. You can either git clone the project or download it as a zip file (make sure you extract the zip file before proceeding).
Push the code to your device
To push the code we will use the balena CLI (install instructions here). Make sure you are on the project’s root (cd) before running the following command where appName is the application name you set earlier.:
bash

balena push
The CLI will then start the build and deploy process. EdgeIQ image is quite big (over 2.5 GB) so be patient while the CLI downloads and pushes the code. If everything happens successfully, you’ll be greeted by Charlie our unicorn mascot.
Using the project
Give it a try
The sample container that we deploy doesn’t do much. It’s only meant to show that all required software packages are fully functional. The container’s entrypoint will run two python scripts that verify CUDA, cuDNN and OpenCV availability. You can observe the output on balenaCloud’s dashboard or SSH into the container and run the scripts (check_cuda.py and check_opencv.py) manually. The output should look like this (redacted for brevity):


And you’re done! As you can see, our system is correctly detecting the GPU hardware, CUDA, and cuDNN installations. Most importantly, this was achieved by just choosing the right docker image. You should now be able to start building projects that fully utilize GPU acceleration!
What next?
In part two of this series we will explore how alwaysAI can help us work with different neural networks. Stay tuned for that!
In the meantime, you can take advantage of your container capabilities and build awesome projects with OpenCV, an open-source industry-leading computer vision library. It’s wide set of features make it one of the best tools to do image processing and image analysis.
We would love to hear about the cool projects you build! If you decide to give it a go please share your results, you can find us at our forums, on Twitter, on Instagram or on Facebook.
Hi @andrewnhem thanks very much for making this tutorial available. In the post, the related repo seems empty. ( balena-io-playground/jetson-nano-alwaysai · GitHub )
Is it possible to reach the repo?