
This is a guest post written by Luis Martínez de Bartolomé, Senior Software Engineer at Jfrog
Creating C/C++ applications for IoT devices can be a challenge. It requires setting up the compiler and toolchain to cross-build for the embedded architecture, managing the application’s dependencies, and finding a simple and smart way to deploy the application.
In this blog post, we will demonstrate an easier method by building and deploying the following application, comprised of three services, to a Raspberry Pi 3 with Conan and resin.io:
- Eclipse mosquitto: Includes the mosquitto (MQTT broker) application. It will receive and send the MQTT messages from/to the connected applications.
- Thermometer: Sends a MQTT message with the temperature of a city in a specific topic to the mosquitto broker.
- Home Assistant domotic hub instance, subscribed to the broker to display the MQTT messages received, in this case the temperature of our city.
Both the mosquitto and the thermometer service use several third party libraries. Cross-building and linking them would be difficult without the following tools:
- Eclipse PAHO-C library for sending the message.
- Libcurl library to check the city temperature using a public rest API, using the “openweathermap.org” free service.
- JSON-c library to parse the JSON received from the rest API service.
- C-ares library as a dependency of the mosquitto broker.
- OpenSSL as a dependency of both mosquitto and libcurl.
- Zlib as a transitive dependency of OpenSSL and libcurl.
All the third parties and the thermometer service are built as Conan packages for this tutorial, so let’s first explain what Conan is and how we cross-build our applications and dependencies.
What is Conan?
Conan is an open source package manager for C/C++. It uses “recipes” (conanfile.py) to build libraries, applications, etc. Each “recipe” can generate multiple binary packages for different operating systems and architectures. All the binaries and the recipe can coexist in the same Conan repository. You can setup your own Conan repository for free, using JFrog Artifactory Community Edition for C/C++ (on-premises solution) or JFrog Bintray (universal central distribution service).
Once the recipe and binary packages are in a Conan repository, only the binaries matching our configuration will be retrieved; for example, those meant for the Linux/armv7hf system architecture.
Building the application
Our Raspberry Pi runs an armv7hf Linux architecture, so we will:
- Cross-build our application for Linux/armv7hf
- Upload the recipe and generated packages to a Conan repository, in this case a Bintray repository.
Later, when we deploy the application to our device with resin.io, it will download the built application directly, saving time and reducing the complexity of the deployment.

Cross-building the mosquitto service
The mosquitto service is built in the Conan package mosquitto. The mosquitto Conan package is: mosquitto/1.4.15@bincrafters/stable
There are prebuilt binaries in conan-center for many operating systems, but not for linux-armv7hf. We will use a Docker container prepared to cross-build our applications for lasote/conangcc49-armv7hf. This Docker image comes with Conan and Linux armv7hf cross-compiler ready:
$ docker run -it --rm lasote/conangcc49-armv7hf /bin/bash
$ sudo pip install conan --upgrade # Get the latest Conan available
$ conan remote add iot https://api.bintray.com/conan/lasote/testing-iot -i 0
$ conan install mosquitto/1.4.15@bincrafters/stable --build missing
Conan will build the whole dependency tree for linux/armv7hf architecture:

Cross-building packages is much faster than building native packages directly on the Raspberry Pi, and is much faster than using emulators like QEMU.
Finally, we upload all the built packages and the recipe to a personal repository with $ conan upload “*” -r iot --all -c. This repository will be used by resin.io to retrieve all the precompiled libraries needed to build the images, so we won’t need to build anything when our applications are deployed.
Building the thermometer service
Now we’ll build the thermometer service of our application, following almost exactly the same steps.
This is the “recipe” of our thermometer application, conanfile.py:
class MyTempSensorConan(ConanFile):
    name = "my_temp_sensor"
    version = "1.0"
    license = "MIT"
    url = ""
    description = "Simple example of MQTT application sending a fake temperature"
    settings = "os", "arch"
    generators = "cmake"
    exports_sources = "src/*"
    requires = ("paho-c/1.2.0@conan/stable", "libcurl/7.60.0@bincrafters/stable","json-c/0.13.1@bincrafters/stable")

def build(self):
    cmake = CMake(self)
    cmake.configure(source_folder="src")
    cmake.build()

def package(self):
    self.copy("thermometer", dst="bin", src="bin")
The thermometer application is calling a REST API service (with libcurl), parsing the JSON (with JSON-c) and finally sending a MQTT message to the mosquitto broker (with paho-c). We can see the declared “requires” in our recipe.
Now let’s cross-build our application for Linux/ armv7hf:
$ docker run -it --rm -v$(pwd)/thermometer:/home/conan/thermometer lasote/conangcc49-armv7hf /bin/bash
$ cd thermometer
$ sudo pip install conan --upgrade
$ conan remote add iot https://api.bintray.com/conan/lasote/testing-iot -i 0
$ conan create . conan/stable --build missing
$ conan upload “*” -r iot --all -c
We have cross-built the dependency tree (except for zlib and OpenSSL, which were already built in the previous step for our configuration), so Conan directly downloads and links the prebuilt binary for them:

Deploying the application with resin.io
Our applications are now in Conan packages that have been uploaded to our Bintray repository. Let’s see how to deploy them to the Raspberry Pi with resin.io.
Writing the Dockerfiles for our apps
Dockerfile for mosquitto
FROM resin/armv7hf-python


WORKDIR /usr/src/app
ENV LD_LIBRARY_PATH /usr/src/app/bin


RUN sudo pip install conan --upgrade
RUN conan remote add iot https://api.bintray.com/conan/lasote/testing-iot -i 0 \
&& conan profile new default --detect \
&& conan profile update settings.arch=armv7hf default \
&& conan profile update settings.arch_build=armv7hf default \
&& conan install mosquitto/1.4.15@bincrafters/stable --update


RUN sed -i "s|#user mosquitto|user root|g" bin/mosquitto.conf \
&& sed -i "s|#allow_anonymous true|allow_anonymous false|g" bin/mosquitto.conf \
&& sed -i "s|#password_file|password_file /data/mosquitto/mosquitto_pass|g" bin/mosquitto.conf


COPY run.sh /usr/src/app/


CMD ["/usr/src/app/run.sh"]
The Dockerfile does the following:
- Adds our IoT Conan remote where we have all the uploaded applications:
conan remote add iot https://api.bintray.com/conan/lasote/testing-iot -i - Adjusts the default profile to match the armv7hf architecture.
- Runs a
conan install libmosquitto/1.4.15@conan/stablethat will retrieve all the precompiled binaries we’ve built for mosquitto. - Declares a
deploy()method, so that if we install the package using the full referencelibmosquitto/1.4.15@conan/stable, it will copy all the needed built libraries and executables to a local directory.
Dockerfile for thermometer
FROM resin/armv7hf-python


WORKDIR /usr/src/app
ENV LD_LIBRARY_PATH /usr/src/app/bin
RUN pip install conan --upgrade
RUN conan remote add iot https://api.bintray.com/conan/lasote/testing-iot -i 0 \
&& conan profile new default --detect \
&& conan profile update settings.arch=armv7hf default \
&& conan profile update settings.arch_build=armv7hf default \
&& conan install thermometer/1.0@conan/stable --update
COPY run.sh /usr/src/app/
CMD ["/usr/src/app/run.sh"]
Dockerfile for HomeAssistant
FROM homeassistant/raspberrypi3-homeassistant:0.71.0
WORKDIR /usr/src/app
COPY run.sh /usr/src/app/
CMD ["/usr/src/app/run.sh"]
This is a standard image distributed from the official Home Assistant DockerHub
Docker compose.yml
To coordinate the three services we will use Docker Compose. This way we can easily connect home-assistant and our thermometer application to the mosquitto MQTT broker. Lucky for us, resin.io supports deploying and running multiple containers on an IoT device with Docker Compose.
version: "2"
volumes:
   resin-data:
services:
 mosquitto:
   privileged: true
   restart: always
   build:
     context: ./mosquitto
   volumes:
     - resin-data:/data
   ports:
     - 1883:1883
 thermometer:
   privileged: true
   restart: always
   build:
     context: ./thermometer
   depends_on:
     - mosquitto
 hass:
   privileged: true
   restart: always
   build: ./resin-homeassistant
   expose:
     - 80
   ports:
     - 80:8123
   depends_on:
     - mosquitto
   volumes:
     - resin-data:/data
All the applications will share a /data directory where they can write the configuration files and store any other needed files.
Creating the application in resin.io
We have signed up for resin.io and created a new application called ConanDemo. We can now add a new device (Raspberry Pi 3), enter our wifi credentials, and download the operating system image already prepared:

Using Etcher, we flash an SD card with resinOS:

A new device is created and connected after a few minutes:

Deploying the application
From the application dashboard, we retrieve the git remote URL where we will push our Dockerfiles:

We push the code to our repository with the Dockerfiles to deploy the app:
$ git push resin master
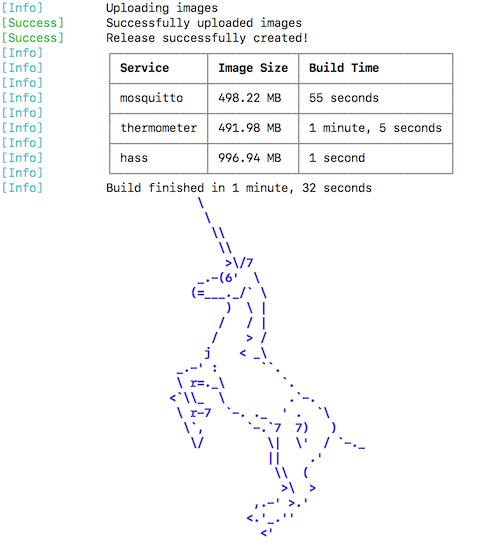
Docker builds the images, the application deploys to the device, and the device uploads the images:


Configuring the application
Once the application services are all deployed to the device, we can SSH into the individual service containers and configure them as needed:
Home Assistant
SSH into the hass service and edit the /data/hass_conf/configuration.yml to add information about how to connect to the mqtt broker and our temperature sensor publishing to the topic home/bedroom/temperature.
mqtt:
  broker: mosquitto
  username: admin
  password: *******
  discovery: true
  discovery_prefix: homeassistant


sensor:


platform: mqtt
name: City Temperature
state_topic: "home/bedroom/temperature"
unit_of_measurement: ' degrees'
value_template: "{{ value_json.temperature }}"
Mosquitto and Thermometer
We also need to configure the environment variables containing the credentials to connect to the mosquitto broker and the city where we want to check the temperature. We can globally configure the mosquitto credentials, and configure them only for the thermometer service in the city:

Remove the mosquitto config file to be regenerated with the new user and password specified in the environment:
$ rm /data/mosquitto/mosquitto.conf
$ rm /data/mosquitto/mosquitto.pass
Now we can reboot the services from the dashboard.
Once the services have rebooted we can access the URL:

And we can see a new sensor connected to the platform, indicating 34º in our city!
Conclusions
The application services in this demonstration are simple examples of what can be developed and deployed to IoT devices. With Conan, we have been able to manage seven dependencies (some of them, like OpenSSL and libcurl, quite complex), without concern for how to build or link them. By including them as a require in our conanfile.py file, we were able to cross-build the entire dependency tree in one step.
We generated binary packages for linux/armv7hf and uploaded them to a repository. Binary management is a must for IoT; the software deployed to the devices should not be source code. With Conan, we can use a CI to cross-build all of the required packages for different architectures and upload them to a Conan repository (JFrog Bintray or JFrog Artifactory).
With resin.io, we then deploy the applications by writing a Dockerfile and a simple “git push,” allowing us to easily manage any number of configured applications and devices.
To learn more about the Conan project you can access to the Conan docs and the Conan github repository. And visit resin.io to sign up for an account – your first 10 devices are always free!