
Depecration notice
During 2021 The Things Network is moving to The Things Stack (V3). If you plan to deploy a LoRaWAN gateway with The Things Network and balena, you should consider to deploy the Basics Station LoRaWAN gateway running with The Things Stack.
If your LoRa concentrator is USB-based and you would like to run it with balenaFin, contact us.
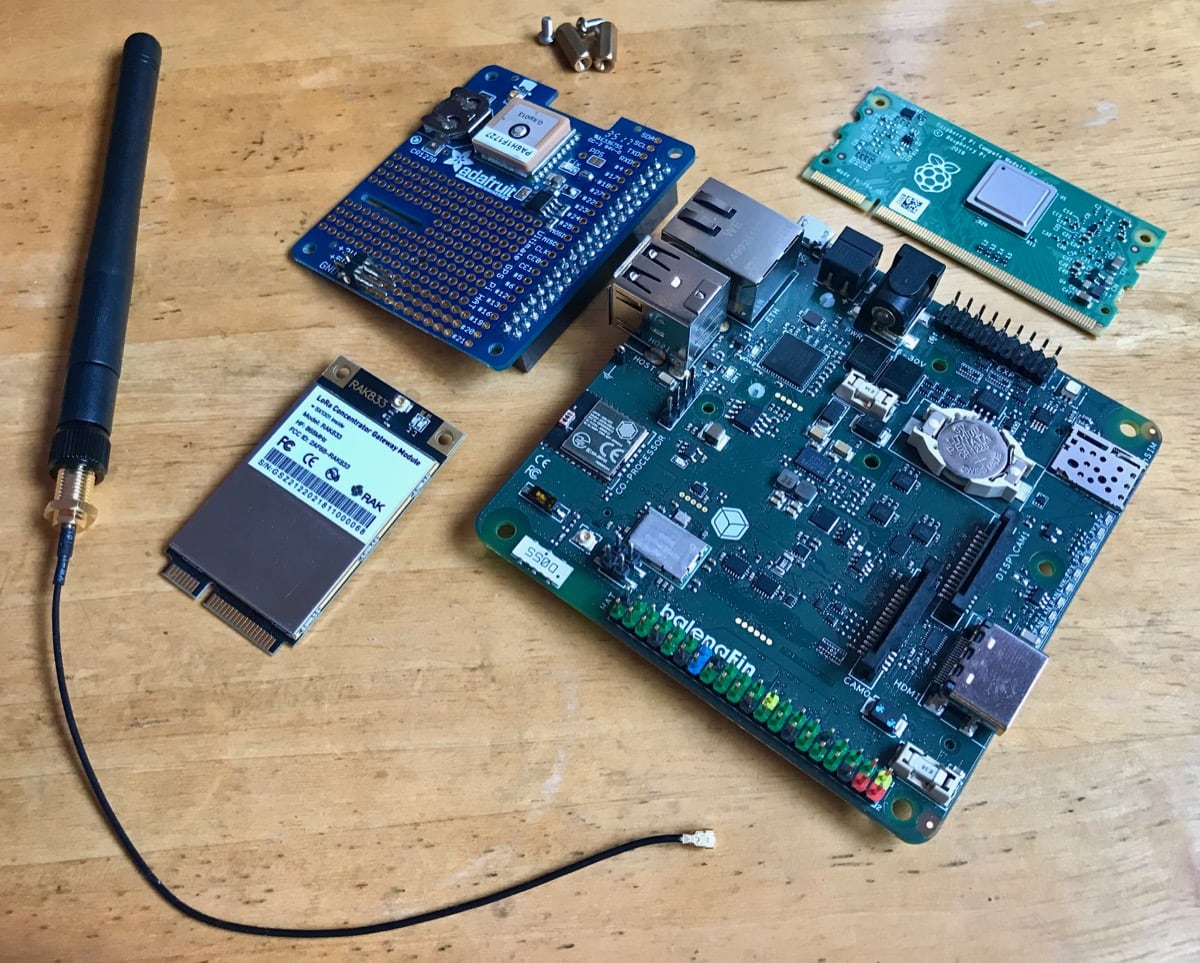
We’ve taken a look at deploying a gateway for TTN on our blog in the past, but this time we’re going to look at setting one up using the new balenaFin with plug and play hardware! We’ll use the on-board mPCIe slot to interface with a RAK Wireless LoRa module, and use an Adafruit GPS HAT on top to give us location and timing information, then we’ll deploy the software using balenaCloud to allow us to remotely manage and update the gateway.

Introduction
The Things Network (TTN) is a connectivity alternative perfect for the IoT. It’s a community supported network of gateways based on LoRaWAN, a wireless data transmission technology combining Long Range (LoRa) with low power and bandwidth requirements.
LoRaWAN is most suited to small data packets, as would be found in monitoring applications, along with triggering and alarm signals. Therefore, TTN and LoRaWAN can be used in those situations where you need to gather small amounts of data over a long distance or wide area. For example; in a farm or crop monitoring scenario, a gateway would be installed centrally and then nodes could be installed widespread across the farm. The range is longer than WiFi and comes without the costs associated with cellular data networks. Typical ranges vary from anything up to 10 km on average, up to a record 702 km (436 miles).
Coverage for the network is provided largely by community-owned gateways, and so here we’re going to take a look at setting up one of these gateways. The gateway can be used to boost the TTN coverage in your area of interest to provide connectivity for your own devices, whilst simultaneously expanding the network and allowing other users to take advantage of the extra coverage. By using balenaCloud to deploy our gateway, we’re able to remotely manage and update it, as well as being able to very quickly and easily add more gateway devices to expand coverage as required.
Hardware required
This project has been built to use only readily-available hardware that you can simply plug together. It’s a nice way to get started and gives you some customizability in terms of how you go about deploying the hardware. We’re not going to look at permanent installation and antennae in this post, but we will be looking at that next time!
- A balenaFin with compute module (CM3L/3+L) – balena store
- RAK833-USB/SPI mPCIe LoRa gateway concentrator module – AliExpress link Note: be sure to select the correct frequency for your country!
- Adafruit Ultimate GPS Pi HAT (optional) – Adafruit
Software required
There are a lot of TTN gateway projects on GitHub already, some based around the use of the Raspberry Pi 3. As the balenaFin is designed to be a direct replacement and compatible with all the software that the Raspberry Pi runs, it’s really simple to take one of these projects and run it on the Fin. We need to make some minor changes this time as we’re using the mPCIe socket for this project, which is an extra feature on the Fin that the Raspberry Pi does not have, and so the interface for the LoRa radio module is different.
I’ve forked one of the more popular Raspberry Pi TTN gateway projects by @jpmeijers and made some changes to get it to work with the balenaFin, so you’ll need:
- A free balenaCloud account – sign up here
- A TTN account – sign up here
- Copy of the ttn-gateway-balenafin repo
- balenaEtcher to flash your balenaFin
- balena CLI tools to push the project to balenaCloud
Set up your balenaFin hardware
First things first, let’s get the hardware assembled, if you need help, take a look at the balenaFin getting started guide.
Insert the compute module and RAK833 module.

Optionally fit and mount the GPS hat with the provided spacers, just as you would with a Raspberry Pi. Note: the HAT connector on the balenaFin is fully compatible with that of the Raspberry Pi 3, the GPS hat used here is the regular Raspberry Pi one.

Flashing the balenaFin and deploying code
For the purposes of this guide I’m going to assume you know the basics when it comes to balenaCloud deployment and avoid going into too much detail. However if you get stuck, we have a lot of great documentation around deploying to your fleet of devices.
Step 1 – Set up the balenaCloud application
If you don’t have one already, sign up for a balenaCloud account. After this, add a new application, ensuring you select the balenaFin as the device type. Next, add a new device to your application, configure your networking and download the balenaOS image.

Step 2 – Flash your balenaFin
Use Etcher to flash your balenaFin with the downloaded OS image. Connect your Fin to your computer using a micro USB cable – note that if you have a Fin v1.1 a separate power supply is not required for flashing! Otherwise you first need to connect the USB cable and then connect a power supply to make the Fin enter flashing mode. When everything is working correctly, you’ll see that the Fin is shown as a ‘Compute Module’ in Etcher (as shown below).

After flashing the Fin, unplugging from your computer and powering up with a suitable power supply, the device should appear in your balenaCloud dashboard; we’re ready to move on to the next step!

If this is your first time working with the balenaFin and you need more help, check out the getting started guide or post in the dedicated balenaFin forum where we’ll be happy to help.
Step 3 – Push the app code
The next step in the process is to push the code to balenaCloud, after which it will automatically distribute it to all of the devices in your application; just the balenaFin you added earlier at this point! We’ll need to download the code from GitHub, then push the project using the balena CLI tools. I’ve summarised the process of doing this below, but if you need more detailed information we have a detailed deployment guide available in our docs.
First of all, download the app from the GitHub repo, to make a copy on your computer.

Then, after installing the balena CLI tool on your computer, from the project directory, execute balena push <appName> where <appName> is the name of the application you created within the balenaCloud dashboard earlier. For example: balena push balenaFin-TTN-gateway.

If all went well you’ll see the balena unicorn mascot and the code you’ve just pushed will automatically be distributed to the devices in your application.

With your hardware provisioned and the code deployed, the next step is to set up the gateway within the TTN console.
Connecting to The Things Network
Before we start, you’re going to need to register for a free TTN account if you don’t have one already: sign up here.
Next, go to gateways and register a new gateway as below. You’ll need to put in your own name and description, as well as set the frequency plan to the correct one that matches your radio module and the country that you’re in.

Once your gateway has been created, we need to add a few variables to the device variables page within your balenaCloud application. These variables are set on a per-device basis, as each gateway will have its own unique key and ID.

The variables you’ll need to add are GW_GPS = true (assuming you’re using the optional GPS!), GW_ID for the gateway ID and GW_KEY for the gateway key. These are found on the gateway overview page within the TTN console (as below):

Once you’ve added these three variables and your device has had a few moments to apply them, you should be up and running! This can be confirmed in a few different ways:
- Your gateway should now be showing as ‘connected’ within the TTN console
- The blue LED on your radio module should be on (as in the image below)
- The logs should mention
concentrator started


What next?
Now you’ve got your gateway up and running, maybe you’re sending and receiving data from other TTN nodes already! When you’re logged in to the TTN console, you can see the number of transmitted and received messages on the gateway overview, and additionally in the Traffic tab.

Build your own nodes
Now that you have a gateway, aside from expanding the TTN coverage, you can also build some nodes and benefit from your own coverage.
We’ll take a look at this more in the future, but to get started you’ll need some node radio modules. These are available for a wide variety of devices, from balenaFin, Arduino, Raspberry Pi, micro:bit. Check out PiSupply.
Build a case
My colleague Daniel has been using this project for his own gateway and designed a cool looking case to mount the gateway on a wall indoors. It’s available on the balena Thingiverse page.

Make it permanent
Getting the gateway running whilst it’s sitting on your desk is one thing, but if you’re serious about expanding the network and providing coverage you’ll be wanting to make your project a more permanent feature.
I’ve been collecting hardware to install my balenaFin gateway on a mast along with a large omnidirectional antenna, and utilizing PoE for power/communication. This will provide coverage for my area and also enable me to upgrade my weather station with some additional sensors in the garden.
In a future post we’ll be getting our hands dirty and looking at the permanent installation of this hardware in more detail.
Until next time…
Thanks for reading, we hope you found the project useful. If you’ve tried it we’d love to hear from you on the forums, on Twitter @balena_io, on Instagram @balena_io or on Facebook where we’d be more than happy to help!