
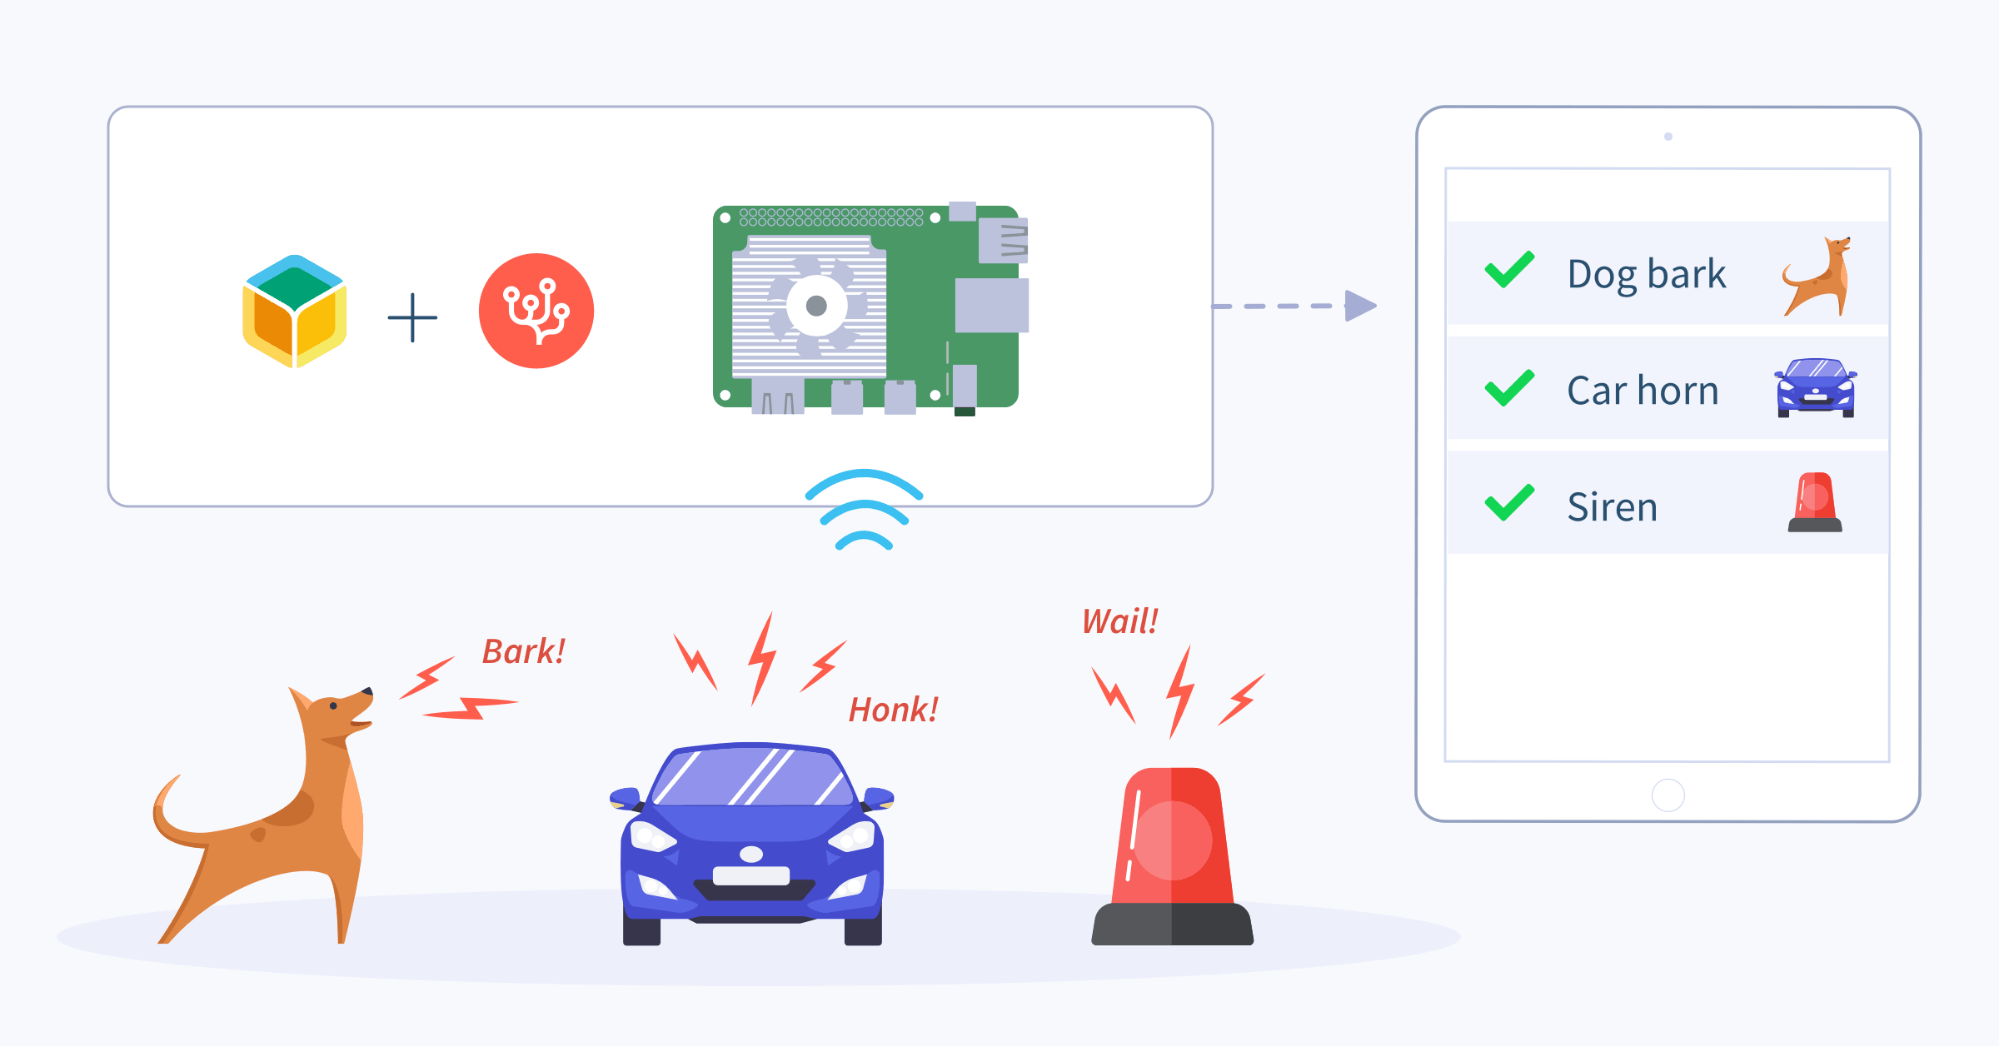
Can we use AI to help us identify and quantify noise pollution? In this project, we’re using a Coral Dev Board or a Raspberry Pi 4 with an attached Edge TPU to listen to ambient sounds 24/7 and categorize them for us.
We’ll also demonstrate how we could deploy a fleet of these devices (e.g. across an entire city) and feed new information back to all the devices to make them “smarter.”
Overview
To help reduce noise pollution, we first need to know which noises are most prevalent and how often they occur. Is it dogs barking at night or loud machinery during the day? How often does it actually occur? Is it worse in one part of town or another?
The use case is not limited to noise pollution. We can train our sound categorization model to recognize almost any audio we want, assuming we have enough samples of the target sound. Sounds we can identify and quantify could include:
- a roadside installation could detect failing truck brakes based on their audio signature
- an auto repair chain could detect various engine sounds indicating different mechanical problems
- property management companies can proactively try to detect faulty machinery and hardware (e.g. HVAC fans and systems) on rooftops
- and many more examples…
What is an Edge TPU?
TPU stands for “Tensor Processing Unit” and is hardware that accelerates machine learning tasks. The “Edge” TPU is a much smaller, more power-efficient version of a TPU that is designed to run on edge devices. The Coral Dev Board has a built-in Edge TPU but you can also get an external one such as the USB Accelerator that can be plugged into a Raspberry Pi. The Edge TPU speeds up inferencing (classifying data to infer a result) through its hardware which is optimized for TensorFlow Lite.
Our setup
Our edge device, or node, will be either a Coral Dev Board or a Raspberry Pi 4 with an attached Edge TPU. The nodes will use an on-board or external microphone to constantly listen for noises above an adjustable volume threshold. Any detected noise will be recorded as a WAV file, processed, and fed to our TensorFlow Lite model running on the local device’s Edge TPU.
Learn more about how we’ve partnered with Coral to provide local AI projects, like this one, to give edge developers a strong hardware and platform start to their projects.
Our model will make a prediction as to the type of the sound, which we can view on a web page hosted on the device. There we can decide if the prediction was accurate, and if not, describe the sound and upload it back to a “master node” so it can be used to eventually re-train the model. The re-trained model can then be distributed back to the nodes, helping the entire fleet to make more accurate predictions.
The optional master node will be an amd64 device (such as a NUC) which will process our sound files, train them on a Tensorflow model, and then convert the model into one that can run on the Edge TPU. We’ll then transfer that updated model to our fleet of “nodes.”
We’ll use balenaCloud to manage the master node and the edge nodes, as well as all communication among the fleet.
Hardware required
All you need to get started is one compatible edge device (see below) on which you can install the application to start identifying sounds. (We’ve included a pre-trained model that identifies ten common city noises.) Part 1 of the post concentrates on this type of setup.
- Coral Dev board and/or a Raspberry Pi 4 with a Coral Edge TPU and microphone (Raspberry Pis don’t have a built in mic)
- SD card for Coral Dev board or Raspberry Pi.
- USB-C power adapter for the Pi 4 or Coral Dev
Software required
We’ve written all of the software already, so you’ll just need to use the “Deploy with Balena” button below to create an image you can burn to an SD card. We recommend balenaEtcher to burn your images.
You can check out the balena GitHub repo for the audio analyzer project if you’re an experienced user and want to deploy this project manually with balenaCLI. If you plan to follow part two by setting up a master training node, you may find it more convenient to clone this project’s repository locally and use the CLI.
Setting up an edge node
We’ll start by setting up one edge node that will use a pre-trained Edge-TPU compatible model to identify 10 different noises based on the Urban Sound Dataset These noises include: air conditioner, car horn, children playing, dog bark, drilling, engine idling, gun shot, jackhammer, siren, and street music.
You’ll need a free balenaCloud account (your first ten devices are free and fully-featured) to set up and manage your edge device. Once you’ve created your balenaCloud account, and are logged in, click the ‘deploy with balena’ below:
Select your device type (either Coral Dev or Raspberry Pi 4) and then click “Create and deploy.” Note: you can name the application whatever you choose to. We provide the repo name as a default.

At this point, balenaCloud is automatically copying all of the software for the project from the GitHub repo to your application and building it in the background.

Add a device and download the balenaOS disk image
Next, add your device to the application by flashing your SD card. Within the application, select on the upper left corner ‘Add device.’ If your device has WiFi capability that you wish to utilize, be sure to select ‘Wifi + Ethernet’ to set up the wireless network. Enter your WiFi SSID and password – this injects the details into the downloaded OS so that the device will automatically link up to the WiFi when it starts up.
Flash the SD card and boot the device
Once the disk image is downloaded, you need to flash it into an SD card. We recommend using balenaEtcher to do so. Etcher will prepare a bootable SD card and validate that it was flashed correctly. Note that you can burn several SD cards with the same image file, and all the devices will boot and provision into your application’s fleet.
If you are using a Pi 4, make sure the Edge TPU is plugged into one of the USB 3 (blue) ports, and a suitable audio input is available. (more on that below.) Then power up the device. If you are using the Coral Dev board, you’ll need to follow a few additional steps:
Unplug the Coral Dev Board and change the boot mode switches to 1:on 2:off 3:on 4:on to boot from the SD card. Insert the SD card into your Coral Dev Board and then power on the board using a 2-3A power cable connected to the USB-C port labeled “PWR”.
Warning: This will completely erase the internal storage media, so make a backup first if you’ve been using your device and have stuff you don’t want to lose.
When flashing is complete, your board will shut down. Unplug the power, remove the SD card, and reset the boot switches to eMMC mode setting them to 1:on 2:off 3:off 4:off. Then power on the Coral Dev Board again to boot the device from eMMC. It will take a minute or two for the Coral Dev Board to appear on your balena dashboard.
After a few minutes, (or longer depending on your internet connection speed) you should see the application’s three three containers in a running state on the dashboard:

Now you are ready to classify some noises!
Start analyzing noise
Using the noise analyzer
The first step is to get some audio into the device using a microphone. The Coral Dev board has an on-board microphone which is set as the default, so if you want to use that, you don’t need to change anything. On the Raspberry Pi 4, (or the Coral Dev if you don’t want to use the onboard mic) you’ll need to use additional hardware.
A simple, inexpensive USB microphone such as this one is a quick way to get audio into the device. Beware that some inexpensive microphones have very poor sensitivity. It may be worth it to spend a little extra for higher quality. Another option is use a sound card, Pi HAT or outboard analog to digital converter such as a FocusRite iTrack Solo.
When the “recorder” container starts, it generates a list of detected audio input devices as well as the board’s default audio input. To view this information, click the “device detail” link at the bottom of the device’s web interface, which is discussed below.

If you want to change the input device from the listed default, you can add a service variable named INPUT_INDEX to the “recorder” container to choose a different input. To add a service variable, click the “Device service Variables” button on the left side of the dashboard, then “+ Add variable” at the top.

The “Add variable” dialog box will appear. Select “recorder” from the “Service” dropdown, type INPUT_INDEX for the “Name”, and put the index number of the input (from the list described above) you want to use as the “Value” and click “Add.”

You can find a list of additional service variables that can be used to customize the application in the Github readme.
Once you have your audio source set up, you can begin capturing sounds. By default, the device will start recording when noise reaches a preset intensity level. You can adjust this level using the WAV_REC_THRESHOLD service variable. Initially it’s set to 2000, which is a unitless number representing the relative average peak sound level. You may need to experiment with this setting along with the sensitivity of your microphone to find an optimal value. You can tell when a recording starts or stops by watching the logs in your dashboard.

You can also see the output of the classifier, which evaluates recordings as they are made and attempts to classify them against the ten sounds the model is trained on. Since the ultimate goal of the project is to improve the classification accuracy of the model, we’re actually more interested in the sounds that are poorly classified.
With that in mind, the default application behavior is to delete sounds that have a prediction certainty above 70% so you can concentrate on identifying the remaining sounds. You can change this behavior by setting the classifier’s AUTO_DELETE service variable to false. In addition, you can change the CERTAINTY_THRESHOLD to a value other than 70%.
Using the web Interface
A web interface is available to view and listen to the recorded files. In addition, you can delete files, re-classify them, and with an optional master node, you can upload them to be used for re-training the model.
To view the application’s web interface, browse to the device IP address (listed on the dashboard) if you are on the same network. You can also enable the public URL feature to view the webpage anywhere outside your network.

The initial state of the web page when opened is to show all recorded sound files that have not been uploaded or deleted in reverse chronological order of file creation date. Use the audio controls to play or download individual files. The button with the trashcan icon deletes the file.
You can sort any columns whose headings are hyperlinks. Hovering over the file creation date displays the filename. The table automatically updates every 30 seconds. Each file has a status as defined below:
| Status | Description |
|---|---|
| created | File has been created but not yet classified using the model. |
| evaluated | File has been classified by the model. |
| deleted | File has been deleted either manually or by auto delete. |
| ready | File has been marked for uploading. You can still delete the file to prevent it from being uploaded. |
| uploaded | The file has been uploaded to the master and deleted locally. |
| missing | The file could not be found due to an error. |
All of the data used by the application is stored in a SQLite database. To export the data in JSON format, you can simply browse to the page /export. Using this data to fill a heatmap or a grafana chart can provide some powerful visualizations for the noises in your vicinity.
Uploading Files
You can designate files to be uploaded to the master by clicking the blue button with the cloud icon for the designated row. When you click the button, the “tag file for upload” dialog box appears.

Here you can provide the correct classification for the selected file. The “Description” and “notes” fields are optional. When you click submit, the file status changes to “ready” and it is part of the batch ready to be uploaded. You can see the number of files ready to be uploaded in the upper right of the page.
Keep in mind that there may be a good reason why the model did not properly classify a noise. There could have been an additional overlapping noise, someone talking over the sound, or the level was too low or too high. If the sound sample is not a good, clean representation of the sound you want to classify, the best move may be to delete it!
In order to upload sound files or add new classes to the list, a master training node must be set up. You may wonder why we don’t do training on the edge device itself? There are a few reasons:
- We want the edge device to be available at all times to record and classify sounds, which would likely be impacted by performing training.
- On-device training using the Edge TPU has some very specific model requirements and is optimized primarily for image classification.
- Running the full version of TensorFlow on the master node provides more options for the type of model and training procedure.
Once you have a master node set up, provide the master’s UUID as a value for the webserver service variable named MASTER_NODE, as well as the MINIO_ACCESS_KEY and MINIO_SECRET_KEY. Again, this information will be covered in part 2.
If all of the above requirements are met, and you have files ready to be uploaded, the “Upload” button on the upper right of the page should be enabled. Once the files have been uploaded, they are deleted from the local device. You can view the list of deleted files by clicking on the “Filter by: Deleted” radio button.
If you’re not interested in setting up your own master node, we’ve set up a public one where you can contribute sound files to help us improve the included model. Simply set the following service variables for your device:
| Service | Name | Value |
|---|---|---|
| webserver | MASTER_NODE | 5285ab87576df576b98729ffb7c7e07f |
| webserver | MINIO_ACCESS_KEY | public |
| webserver | MINIO_SECRET_KEY | secret456 |
Note that uploading any files to this server potentially makes them publicly available. (If you set up your own master node, it will be private.)
How it works
Audio classification has some similarities to image classification, which is a popular task for machine learning. We want to find patterns in the noises we are classifying so we can train a neural network to recognize them. Here is a visualization of the raw audio waveform of two different barking dogs, as well as a siren:

We can see similarities between the two dog bark waveforms, and how they differ from the siren. Unfortunately, these raw waveforms, which are sampled at 44,100 times per second, contain far too much data to feed into a relatively simple neural network for training/classification. Instead, we use a program called librosa to extract small “shorthand” representations of the audio file that still provides enough information to detect a pattern.
For instance, if we extract certain features of the audio waveforms above, we can create a spectrogram, which represents the amplitude of audio frequencies over time:

(The amplitude is indicated by the colors in the spectrogram.)
We can still see the patterns in the sound, but we have greatly reduced the amount of data for each sound sample. In this case, the original 4 second mono file would have 176,400 data points (44,100 samples per second x 4 seconds) while the file of extracted features has only 194 data points.
It is this shorthand version of sound files that we used to train the included model. Therefore, we also convert all detected noises to this shorthand version so the model can perform a prediction. The original model was built using Keras on TensorFlow 2.2, converted to TensorFlow Lite, then specially compiled to run on an Edge TPU.
What’s next?
Let us know your success at identifying any of the ten sounds. Accurate audio classification depends on many factors such as microphone placement, quality training and testing datasets, well-chosen audio feature extraction, and model type. At its best, the model contained here is about 66% accurate. (For comparison, a human is only about 81% accurate at identifying these sounds, so this tiny edge device is achieving 80% of human abilities).
If you’d like to train the model to recognize additional sounds or add fleet intelligence to this project, stay tuned for part 2 of this post which covers the following topics:
- Setting up a master node
- Building, training and evaluating a TensorFlow model for noise classification
- Testing the TensorFlow model and making adjustments
- Converting a model to TensorFlow Lite and compiling for the Edge TPU
- Using balenaCloud to manage the fleet
If you tried this project out, we’d like to know! Let us know of your progress on the GitHub repo, Twitter, or on our Forums (especially if you need some help). Stay tuned for a follow-up to this project where we take things even further with AI-driven listening and analysis.
Find other projects like this one on balenaHub, our catalog of community edge and IoT projects. Try one out for free.
Thank you for your feedback @xxyy_17
Let’s see if @alanb128 can help you here solving your questions!
@jtaud Thanks for trying this out and for the kind words. That is a great question Let’s ask the author, @alanb128 to see what his plans are.
jtaud– were you trying this out of curiosity or using this for a real-world use case? Would you like to collaborate on building a “part 2”? We’re always looking for opportunities to work with our community.
Pardon my ignorance, I’m looking to get started on tensorFlow.
would this tutorial work on a Dev Micro board?
Hello @Ando welcome to the balena community! This dev board looks like it can run Coral machine learnign models but it can’t run balena. It depends on what you would like to do!